Singularity
Getting Started
Quick Start
This guide is intended for running Singularity on a computer where you have root (administrative) privileges. If you are learning about Singularity on a system where you lack root privileges, you can still complete the steps that do not require the sudo command. If you need to request an installation on your shared resource, check out our requesting an installation help page for information to send to your system administrator.
Installation
git clone https://github.com/singularityware/singularity.git
cd singularity
./autogen.sh
./configure --prefix=/usr/local
make
sudo make install
Singularity must be installed as root to function properly.
Overview of the Singularity Interface
$ singularity --help
USAGE: singularity [global options...] <command> [command options...] ...

GLOBAL OPTIONS:
    -d|--debug    Print debugging information
    -h|--help     Display usage summary
    -s|--silent   Only print errors
    -q|--quiet    Suppress all normal output
       --version  Show application version
    -v|--verbose  Increase verbosity +1
    -x|--sh-debug Print shell wrapper debugging information

GENERAL COMMANDS:
    help       Show additional help for a command or container
    selftest   Run some self tests for singularity install

CONTAINER USAGE COMMANDS:
    exec       Execute a command within container
    run        Launch a runscript within container
    shell      Run a Bourne shell within container
    test       Launch a testscript within container

CONTAINER MANAGEMENT COMMANDS:
    apps       List available apps within a container
    bootstrap  *Deprecated* use build instead
    build      Build a new Singularity container
    check      Perform container lint checks
    inspect    Display a container's metadata
    mount      Mount a Singularity container image
    pull       Pull a Singularity/Docker container to $PWD

COMMAND GROUPS:
    image      Container image command group
    instance   Persistent instance command group


CONTAINER USAGE OPTIONS:
    see singularity help <command>

For any additional help or support visit the Singularity
website: http://singularity.lbl.gov/
$ singularity --debug run shub://GodloveD/lolcow
And to pass the option to the command and run a Singularity image in an isolated manner:
$ singularity run --containall shub://GodloveD/lolcow
To learn more about a specific Singularity command, type one of the following:
$ singularity help <command>
$ singularity --help <command>
$ singularity -h <command>
$ singularity <command> --help
$ singularity <command> -h
$ singularity help container.simg            # See the container's help, if provided
$ singularity help --app foo container.simg  # See the help for foo, if provided
Download pre-built images
You can use the a href=“sec:pull”>pull</a> and a href=”sec:build”>build</a> commands to download pre-built images from an external resource like `Singularity Hub`_ or Docker Hub. When called on a native Singularity images like those provided on Singularity Hub, simply downloads the image file to your system.
$ singularity pull shub://vsoch/hello-world   # pull with default name, vsoch-hello-world-master.simg
$ singularity pull --name hello.simg shub://vsoch/hello-world   # pull with custom name
$ singularity pull docker://godlovedc/lolcow  # with default name
$ singularity pull --name funny.simg docker://godlovedc/lolcow # with custom name
$ singularity build hello-world.simg shub://vsoch/hello-world
$ singularity build lolcow.simg docker://godlovedc/lolcow
Unlike , will convert your image to the latest Singularity image format after downloading it.
is like a “Swiss Army knife” for container creation. In addition to downloading images, you can use to create images from other images or from scratch using a a href=“sec:recipefile”>recipe file</a>. You can also use to convert an image between the 3 major container formats supported by Singularity. We discuss those image formats below in the a href=”sec:buildimagesfromscratch”>Build images from scratch</a> section.
Interact with images
Once you have an image, you can interact with it in several ways. For these examples we will use a image that can be downloaded from Singularity Hub like so.
$ singularity pull --name hello-world.simg shub://vsoch/hello-world
The <a href=”#sec:shell”>shell</a> command allows you to spawn a new shell within your container and interact with it as though it were a small virtual machine.
$ singularity shell hello-world.simg
Singularity: Invoking an interactive shell within container...

# I am the same user inside as outside!
Singularity hello-world.simg:~/Desktop> whoami
vanessa

Singularity hello-world.simg:~/Desktop> id
uid=1000(vanessa) gid=1000(vanessa) groups=1000(vanessa),4(adm),24,27,30(tape),46,113,128,999(input)
also works with the and URIs. This creates an ephemeral container that disappears when the shell is exited.
$ singularity shell shub://vsoch/hello-world
The <a href=”#sec:exec”>exec</a> command allows you to execute a custom command within a container by specifying the image file. For instance, to list the root (/) of our hello-world.simg image, we could do the following:
$ singularity exec hello-world.simg ls /
anaconda-post.log  etc   lib64       mnt   root  singularity  tmp
bin        home  lost+found  opt   run   srv          usr
dev        lib   media       proc  sbin  sys          var
$ singularity exec shub://singularityhub/ubuntu cat /etc/os-release
Singularity containers contain “a href=”#sec:runscript”>runscripts</a>”. These are user defined scripts that define the actions a container should perform when someone runs it. The runscript can be triggered with the run command, or simply by calling the container as though it were an executable.
$ singularity run hello-world.simg
$ ./hello-world.simg
also works with and URIs. This creates an ephemeral container that runs and then disappears.
$ singularity run shub://GodloveD/lolcow
$ echo "Hello World" > $HOME/hello-kitty.txt
$ singularity exec vsoch-hello-world-master.simg cat $HOME/hello-kitty.txt
Hello World
$ echo "I am your father" >/data/vader.sez
$ ~/sing-dev/bin/singularity exec --bind /data:/mnt hello-world.simg cat /mnt/vader.sez
I am your father
Build images from scratch
For more details about the different build options and best practices, read about the <a href=”#sec:singularityflow”>singularity flow</a>.
$ sudo singularity build --sandbox ubuntu/ docker://ubuntu
$ sudo singularity build --writable ubuntu.img docker://ubuntu
$ sudo singularity shell --writable ubuntu.img
$ singularity build new-squashfs sandbox
Bootstrap: shub
From: singularityhub/ubuntu

%runscript
    exec echo "The runscript is the containers default runtime command!"

%files
   /home/vanessa/Desktop/hello-kitty.txt        # copied to root of container
   /home/vanessa/Desktop/party_dinosaur.gif     /opt/the-party-dino.gif #

%environment
    VARIABLE=MEATBALLVALUE
    export VARIABLE

%labels
   AUTHOR vsochat@stanford.edu

%post
    apt-get update && apt-get -y install python3 git wget
    mkdir /data
    echo "The post section is where you can install, and configure your container."
To build a container from this definition file (assuming it is a file named Singularity), you would call build like so:
$ sudo singularity build ubuntu.simg Singularity
Introduction
This document will introduce you to Singularity, and the links in the bar to the left will give you more detail on using the software. If you want to get a quick rundown, see our quickstart. If you want to understand which commands are best fit for your usecase, see our build flow page. There is also a separate Singularity Administration Guide that targets system administrators, so if you are a service provider, or an interested user, it is encouraged that you read that document as well.
Welcome to Singularity!
A High Level View of Singularity
%SERVER and %CLUSTER are large expensive systems with resources far exceeding those of my personal workstation. But because the are shared systems, no users have root access. The environments are tightly controlled and managed by a staff of system administrators. To keep these systems secure, only the system administrators are granted root access and they control the state of the operating systems and installed applications. If a user is able to escalate to root (even within a container) on %SERVER or %CLUSTER, they can do bad things to the network, cause denial of service to the host (as well as other hosts on the same network), and may have unrestricted access to file systems reachable by the container.
- Copying or branching an entire container is as simple as
- Permission/access to the container is managed via standard file system permissions
- Large scale performance (especially over parallel file systems) is very efficient
- No caching of the image contents to run (especially nice on clusters)
- Containers are compressed and consume very little disk space
- Images can serve as stand-alone programs, and can be executed like any other program on the host
Copying, sharing, branching, and distributing your image
Supported container formats
- squashfs: the default container format is a compressed read-only file system that is widely used for things like live CDs/USBs and cell phone OS’s
- ext3: (also called ) a writable image file containing an ext3 file system that was the default container format prior to Singularity version 2.4
- directory: (also called ) standard Unix directory containing a root container image
- tar.gz: zlib compressed tar archive
- tar.bz2: bzip2 compressed tar archive
- tar: uncompressed tar archive
Supported URIs
Singularity also supports several different mechanisms for obtaining the images using a standard URI format.
- shub:// Singularity Hub is our own registry for Singularity containers. If you want to publish a container, or give easy access to others from their command line, or enable automatic builds, you should build it on `Singularity Hub`_.
- docker:// Singularity can pull Docker images from a Docker registry, and will run them non-persistently (e.g. changes are not persisted as they can not be saved upstream). Note that pulling a Docker image implies assembling layers at runtime, and two subsequent pulls are not guaranteed to produce an identical image.
- instance:// A Singularity container running as service, called an instance, can be referenced with this URI.
$ singularity exec dummy.img xterm  # run xterm from within the container
$ singularity exec dummy.img python script.py  # run a script on the host system using container's python
$ singularity exec dummy.img python < /path/to/python/script.py  # do the same via redirection
$ cat /path/to/python/script.py | singularity exec dummy.img python  # do the same via a pipe
You can even run MPI executables within the container as simply as:
$ mpirun -np X singularity exec /path/to/container.img /usr/bin/mpi_program_inside_container (mpi program args)
When executing container commands, the Singularity process flow can be generalized as follows:
- Singularity application is invoked
- Global options are parsed and activated
- The Singularity command (subcommand) process is activated
- Subcommand options are parsed
- The appropriate sanity checks are made
- Environment variables are set
- The Singularity Execution binary is called ()
- Sexec determines if it is running privileged and calls the code if necessary
- Namespaces are created depending on configuration and process requirements
- The Singularity image is checked, parsed, and mounted in the namespace
- Bind mount points are setup so that files on the host are visible in the container
- The namespace is used to virtualize a new root file system
- Singularity calls and Singularity process itself is replaced by the process inside the container
- When the process inside the container exits, all namespaces collapse with that process, leaving a clean system
All of the above steps take approximately 15-25 thousandths of a second to run, which is fast enough to seem instantaneous.
The Singularity Usage Workflow
Singularity workflow
- develop and test containers using (build into a writable directory) or (build into a writable ext3 image)
- build your production containers with a squashfs filesystem.
- <a href=”#sec:build”>build</a>: Build a container on your user endpoint or build environment
- <a href=”#sec:exec”>exec</a>: Execute a command to your container
- <a href=”#sec:inspect”>inspect</a>: See labels, run and test scripts, and environment variables
- <a href=”#sec:pull”>pull</a>: pull an image from Docker or Singularity Hub
- <a href=”#sec:run”>run</a>: Run your image as an executable
- <a href=”#sec:shell”>shell</a>: Shell into your image
Image Commands
- <a href=”#sec:imageimport”>image.import</a>: import layers or other file content to your image
- <a href=”#sec:imageexport”>image.export</a>: export the contents of the image to tar or stream
- <a href=”#sec:imagecreate”>image.create</a>: create a new image, using the old ext3 filesystem
- <a href=”#sec:imageexpand”>image.expand</a>: increase the size of your image (old ext3)
- <a href=”#sec:instances”>instances</a>: Start, stop, and list container instances
Deprecated Commands The following commands are deprecated in 2.4 and will be removed in future releases.
- <a href=”#sec:bootstrap”>bootstrap</a>: Bootstrap a container recipe
Support
Have a question, or need further information? Reach out to us.
Installation
This document will guide you through the process of installing Singularity from source with the version and location of your choice.
Before you begin
$ sudo apt-get update && \
    sudo apt-get install \
    python \
    dh-autoreconf \
    build-essential \
    libarchive-dev
$ sudo yum update && \
    sudo yum groupinstall 'Development Tools' && \
    sudo yum install libarchive-devel
Install the master branch
The following commands will install the latest version of the GitHub repo master branch to .
$ git clone https://github.com/singularityware/singularity.git
$ cd singularity
$ ./autogen.sh
$ ./configure --prefix=/usr/local --sysconfdir=/etc
$ make
$ sudo make install
Install a specific release
$ VER=2.5.1
$ wget https://github.com/singularityware/singularity/releases/download/$VER/singularity-$VER.tar.gz
$ tar xvf singularity-$VER.tar.gz
$ cd singularity-$VER
$ ./configure --prefix=/usr/local --sysconfdir=/etc
$ make
$ sudo make install
Install the development branch
$ git clone https://github.com/singularityware/singularity.git
$ cd singularity
$ git fetch
$ git checkout development
$ ./autogen.sh
$ ./configure --prefix=/usr/local --sysconfdir=/etc
$ make
$ sudo make install
Remove an old version
Let’s say that we installed Singularity to . To remove it completely, you need to hit all of the following:
$ sudo rm -rf /usr/local/libexec/singularity
$ sudo rm -rf /usr/local/etc/singularity
$ sudo rm -rf /usr/local/include/singularity
$ sudo rm -rf /usr/local/lib/singularity
$ sudo rm -rf /usr/local/var/lib/singularity/
$ sudo rm /usr/local/bin/singularity
$ sudo rm /usr/local/bin/run-singularity
$ sudo rm /usr/local/etc/bash_completion.d/singularity
$ sudo rm /usr/local/man/man1/singularity.1
$ sudo rm -rf /some/temp/dir
What should you do next? You can check out the a href=“sec:quickstart”>quickstart</a> guide, or learn how to interact with your container via the a href=”sec:shell”>shell</a>, a href=“sec:exec”>exec</a> , or a href=”sec:run”>run</a> commands. Or click next below to continue reading.
Build a Container
is the “Swiss army knife” of container creation. You can use it to download and assemble existing containers from external resources like `Singularity Hub`_ and Docker Hub. You can use it to convert containers between the various formats supported by Singularity. And you can use it in conjunction with a <a href=”#sec:recipefile”>Singularity recipe</a> file to create a container from scratch and customized it to fit your needs.
Overview
- URI beginning with shub:// to build from Singularity Hub
- URI beginning with docker:// to build from Docker Hub
- path to a existing container on your local machine
- path to a directory to build from a sandbox
- path to an archive in .tar or compressed .tar.gz format
- path to a <a href=”#sec:recipefile”>Singularity recipe file</a>
- compressed read-only squashfs file system suitable for production (default)
- writable ext3 file system suitable for interactive development ( option )
- writable (ch)root directory called a sandbox for interactive development ( option)
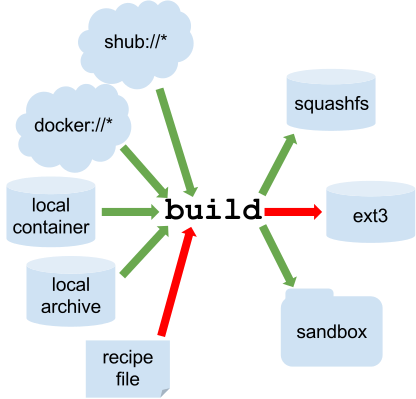
Singularity build process
Downloading a existing container from Singularity Hub
You can use the build command to download a container from Singularity Hub.
$ singularity build lolcow.simg shub://GodloveD/lolcow
Downloading a existing container from Docker Hub
You can use to download layers from Docker Hub and assemble them into Singularity containers.
$ singularity build lolcow.simg docker://godlovedc/lolcow
Creating - -writable images and - -sandbow directories
$ sudo singularity build --writable lolcow.img shub://GodloveD/lolcow
$ sudo singularity shell --writable lolcow.img
If you wanted to create a container within a writable directory (called a sandbox) you could do so with the option. It’s possible to create a sandbox without root privileges, but to ensure proper file permissions it is recommended to do so as root.
$ sudo singularity build --sandbox lolcow/ shub://GodloveD/lolcow
$ sudo singularity shell --writable lolcow/
Converting containers from one format to another
If you already have a container saved locally, you can use it as a target to build a new container. This allows you convert containers from one format to another. For example if you had a squashfs container called and wanted to convert it to a writable ext3 container called you could:
$ sudo singularity build --writable development.img production.simg
$ singularity build --sandbox development/ production.simg
If you omit any options you can also convert your sandbox back to a read-only compressed squashfs image suitable for use in a production environment:
$ singularity build production2 development/
Building containers from Singularity recipe files
Bootstrap: docker
From: ubuntu:16.04

%post
    apt-get -y update
    apt-get -y install fortune cowsay lolcat

%environment
    export LC_ALL=C
    export PATH=/usr/games:$PATH

%runscript
    fortune | cowsay | lolcat
You can do so with the following command.
$ sudo singularity build lolcow.simg Singularity
The command requires just as installing software on your local machine requires root privileges.
If you only want to build a single section of your Singularity recipe file use the option. For instance, if you have edited the section of a long Singularity recipe and don’t want to completely re-build the container, you could re-build only the section like so:
$ sudo singularity build --section environment image.simg Singularity
Under normal build conditions, the Singularity recipe file is saved into a container’s meta-data so that there is a record showing how the container was built. Using the option may render this meta-data useless, so use care if you value reproducibility.
If you don’t want to run the section during the container build, you can skip it with the option. For instance, maybe you are building a container intended to run in a production environment with GPUs. But perhaps your local build resource does not have GPUs. You want to include a section that runs a short validation but you don’t want your build to exit with an error because it cannot find a GPU on your system.
$ sudo singularity build GPU.simg --notest Singularity
CHECKS OPTIONS:
    -c|--checks    enable checks
    -t|--tag       specify a check tag (not default)
    -l|--low       Specify low threshold (all checks, default)
    -m|--med       Perform medium and high checks
    -h|--high      Perform only checks at level high
When you add the option along with applicable tags to the command Singularity will run the desired checks on your container at build time. See for available tags.
More Build topics
- If you want to customize the cache location (where Docker layers are downloaded on your system), specify Docker credentials, or any custom tweaks to your build environment, see a href=”#sec:buildenv”>build environment</a>.
- If you want to make internally modular containers, check out the getting started guide here
- If you want to build your containers on Singularity Hub, (because you don’t have root access on a Linux machine or want to host your container on the cloud) check out this guide
Build Environment
It’s commonly the case that you want to customize your build environment, such as specifying a custom cache directory for layers, or sending your Docker Credentials to the registry endpoint. Here we will discuss those things
Cache Folders
To make download of layers for build and <a href=”#sec:pull”>pull</a> faster and less redundant, we use a caching strategy. By default, the Singularity software will create a set of folders in your directory for docker layers, Singularity Hub images, and Docker metadata, respectively:
$HOME/.singularity
$HOME/.singularity/docker
$HOME/.singularity/shub
$HOME/.singularity/metadata
Fear not, you have control to customize this behavior! If you don’t want the cache to be created (and a temporary directory will be used), set to True/yes, or if you want to move it elsewhere, set to the full path where you want to cache. Remember that when you run commands as sudo this will use root’s home at and not your user’s home.
Temporary Folders
singularity exec docker://busybox /bin/sh
SINGULARITY_LOCALCACHEDIR=/tmp/pancakes
export SINGULARITY_LOCALCACHEDIR
singularity exec docker://busybox /bin/sh
Pull Folder
For details about customizing the output location of a href=“sec:pull”>pull</a>, see the a href=”sec:pull”>pull docs</a>. You have the similar ability to set it to be something different, or to customize the name of the pulled image.
Environment Variables
- First preference goes to environment variable set at runtime
- Second preference goes to default defined in this file
- Then, if neither is found, null is returned except in the case that . A variable not found will system exit with an error.
- Variables that should not be displayed in debug logger are set with , and are only reported to be defined.
For boolean variables, the following are acceptable for True, with any kind of capitalization or not:
("yes", "true", "t", "1","y")
Cache
singularity --debug run docker://busybox echo "pizza!"
...
DEBUG   [U=1000,P=960]     s_rmdir()                                 Removing directory: /tmp/.singularity-runtime.oArO0k
The following variables have defaults that can be customized by you via environment variables at runtime.
Docker
Singularity Hub
/usr/bin/python
and we would parse it into the runscript as:
exec /usr/bin/python "$@"
However, it might be the case that the user does not want this. For this reason, we have the environmental variable . If defined as yes/y/1/True/true, etc., then the runscript will remain as .
Container Recipes
A Singularity Recipe is the driver of a custom build, and the starting point for designing any custom container. It includes specifics about installation software, environment variables, files to add, and container metadata. You can even write a help section, or define modular components in the container called based on the Scientific Filesystem.
Overview
A Singularity Recipe file is divided into several parts:
- Header: The Header describes the core operating system to build within the container. Here you will configure the base operating system features that you need within your container. Examples of this include, what distribution of Linux, what version, what packages must be part of a core install.
- Sections: The rest of the definition is comprised of sections, sometimes called scriptlets or blobs of data. Each section is defined by a character followed by the name of the particular section. All sections are optional. Sections that are executed at build time are executed with the interpreter and can accept options. Similarly, sections that produce scripts to be executed at runtime can accept options intended for
The header is at the top of the file, and tells Singularity the base Operating System that it should use to build the container. It is composed of several keywords. Specifically:
- : references the kind of base you want to use (e.g., docker, debootstrap, shub). For example, a shub bootstrap will pull containers for shub as bases. A Docker bootstrap will pull docker layers to start your image. For a full list see a href=”#sec:buildcontainer”>build</a>
- : is the named container (shub) or reference to layers (Docker) that you want to use (e.g., vsoch/hello-world)
Bootstrap: shub
From: vsoch/hello-world
A build that uses a mirror to install Centos-7 might look like this:
Bootstrap: yum
OSVersion: 7
MirrorURL: http://mirror.centos.org/centos-%{OSVERSION}/%{OSVERSION}/os/$basearch/
Include: yum
- shub (images hosted on Singularity Hub)
- `docker`_ (images hosted on Docker Hub)
- localimage (images saved on your machine)
- yum (yum based systems such as CentOS and Scientific Linux)
- debootstrap (apt based systems such as Debian and Ubuntu)
- arch (Arch Linux)
- busybox (BusyBox)
- zypper (zypper based systems such as Suse and OpenSuse)
$ sudo singularity build roar.simg Singularity
%help
Bootstrap: docker
From: ubuntu

%help
Help me. I'm in the container.
And it will work when the user asks the container for help.
$ singularity help roar.simg

Help me. I'm in the container.
%setup
Bootstrap: docker
From: ubuntu

%help
Help me. I'm in the container.

%setup
    touch ${SINGULARITY_ROOTFS}/tacos.txt
    touch avocados.txt
Importantly, notice that the avocados file isn’t relative to $SINGULARITY_ROOTFS, so we would expect it not to be in the image. Is tacos there?
$ singularity exec roar.simg ls /
bin   environment  lib    mnt   root  scif     sys        usr
boot  etc      lib64  opt   run   singularity  **tacos.txt**  var
dev   home     media  proc  sbin  srv      tmp
Yes! And avocados.txt isn’t inside the image, but in our present working directory:
$ ls
avocados.txt   roar.simg   Singularity
%files
Bootstrap: docker
From: ubuntu

%help
Help me. I'm in the container.

# Both of the below are copied before %post
# 1. This is how to copy files for legacy < 2.3
%setup
    touch ${SINGULARITY_ROOTFS}/tacos.txt
    touch avocados.txt

# 2. This is how to copy files for >= 2.3
%files
    avocados.txt
    avocados.txt /opt
Notice that I’m adding the same file to two different places. For the first, I’m adding the single file to the root of the image. For the second, I’m adding it to opt. Does it work?
$ singularity exec roar.simg ls /
 singularity exec roar.simg ls /
**avocados.txt**  dev      home   media  proc  sbin     srv        tmp
bin       environment  lib    mnt    root  scif     sys        usr
boot          etc      lib64  opt    run   singularity  **tacos.txt**  var

$ singularity exec roar.simg ls /opt
**avocados.txt**
We have avocados!
%labels
To store metadata with your container, you can add them to the section. They will be stored in the file as metadata within your container. The general format is a followed by a . Labels from Docker bootstraps will be carried forward here. Let’s add to our example:
Bootstrap: docker
From: ubuntu

%help
Help me. I'm in the container.

%setup
    touch ${SINGULARITY_ROOTFS}/tacos.txt
    touch avocados.txt

%files
    avocados.txt
    avocados.txt /opt

%labels
    Maintainer Vanessasaurus
    Version v1.0
The easiest way to see labels is to inspect the image:
$ singularity inspect roar.simg
{
    "org.label-schema.usage.singularity.deffile.bootstrap": "docker",
    "MAINTAINER": "Vanessasaurus",
    "org.label-schema.usage.singularity.deffile": "Singularity",
    "org.label-schema.usage": "/.singularity.d/runscript.help",
    "org.label-schema.schema-version": "1.0",
    "VERSION": "v1.0",
    "org.label-schema.usage.singularity.deffile.from": "ubuntu",
    "org.label-schema.build-date": "2017-10-02T17:00:23-07:00",
    "org.label-schema.usage.singularity.runscript.help": "/.singularity.d/runscript.help",
    "org.label-schema.usage.singularity.version": "2.3.9-development.g3dafa39",
    "org.label-schema.build-size": "1760MB"
}
You’ll notice some other labels that are captured automatically from the build process. You can read more about labels and metadata a href=”#sec:envandmetadata”>here</a> .
%environment
- during build: the section is written to a file in the container’s metadata folder. This file is not sourced.
- during runtime: the file written to the container’s metadata folder is sourced.
Since the file is ultimately sourced, you should generally use the same conventions that you might use in a bashrc or profile. In the example below, the variables and would not be available during build, but when the container is finished and run:
Bootstrap: docker
From: ubuntu

%help
Help me. I'm in the container.

%setup
    touch ${SINGULARITY_ROOTFS}/tacos.txt
    touch avocados.txt

%files
    avocados.txt
    avocados.txt /opt

%labels
    Maintainer Vanessasaurus
    Version v1.0

%environment
    VADER=badguy
    LUKE=goodguy
    SOLO=someguy
    export VADER LUKE SOLO
For the rationale behind this approach and why we do not source the %environment section at build time, refer to this issue. When the container is finished, you can easily see environment variables also with inspect, and this is done by showing the file produced above:
$ singularity inspect -e roar.simg # Custom environment shell code should follow

    VADER=badguy
    LUKE=goodguy
    SOLO=someguy
    export VADER LUKE SOLO
or in the case of variables generated at build time, you can add environment variables to your container in the section (see below) using the following syntax:
%post
    echo 'export JAWA_SEZ=wutini' >> $SINGULARITY_ENVIRONMENT
When we rebuild, is it added to the environment?
singularity exec roar.simg env | grep JAWA
JAWA_SEZ=wutini
%post
Commands in the section are executed within the container after the base OS has been installed at build time. This is where the meat of your setup will live, including making directories, and installing software and libraries. We will jump from our simple use case to show a more realistic scientific container. Here we are installing yum, openMPI, and other dependencies for a Centos7 bootstrap:
%post
    echo "Installing Development Tools YUM group"
    yum -y groupinstall "Development Tools"
    echo "Installing OpenMPI into container..."

    # Here we are at the base, /, of the container
    git clone https://github.com/open-mpi/ompi.git

    # Now at /ompi
    cd ompi
    ./autogen.pl
    ./configure --prefix=/usr/local
    make
    make install

    /usr/local/bin/mpicc examples/ring_c.c -o /usr/bin/mpi_ring
You cannot copy files from the host to your container in this section, but you can of course download with commands like and and .
%runscript
Bootstrap: docker
From: ubuntu

%help
Help me. I'm in the container.

%setup
    touch ${SINGULARITY_ROOTFS}/tacos.txt
    touch avocados.txt

%files
    avocados.txt
    avocados.txt /opt

%labels
    Maintainer Vanessasaurus
    Version v1.0

%environment
    VADER=badguy
    LUKE=goodguy
    SOLO=someguy
    export VADER LUKE SOLO


%post
    echo 'export JAWA_SEZ=wutini' >> $SINGULARITY_ENVIRONMENT

%runscript
    echo "Rooooar!"
    echo "Arguments received: $*"
    exec echo "$@"
In this particular runscript, the arguments are printed as a single string () and then they are passed to echo via a quoted array () which ensures that all of the arguments are properly parsed by the executed command. Using the command is like handing off the calling process to the one in the container. The final command (the echo) replaces the current entry in the process table (which originally was the call to Singularity). This makes it so the runscript shell process ceases to exist, and the only process running inside this container is the called echo command. This could easily be another program like python, or an analysis script. Running it, it works as expected:
$ singularity run roar.simg
Rooooar!
Arguments received:

$ singularity run roar.simg one two
Rooooar!
Arguments received: one two
one two
%test
You may choose to add a section to your definition file. This section will be run at the very end of the build process and will give you a chance to validate the container during the bootstrap process. You can also execute this scriptlet through the container itself, such that you can always test the validity of the container itself as you transport it to different hosts. Extending on the above Open MPI , consider this real world example:
%test
    /usr/local/bin/mpirun --allow-run-as-root /usr/bin/mpi_test
$ sudo singularity build --notest mpirun.simg Singularity
This argument is useful in cases where you need hardware that is available during runtime, but is not available on the host that is building the image.
Apps
Bootstrap: docker
From: ubuntu

%environment
    VADER=badguy
    LUKE=goodguy
    SOLO=someguy
    export VADER LUKE SOLO

%labels
   Maintainer Vanessasaur

##############################
# foo
##############################

%apprun foo
    exec echo "RUNNING FOO"

%applabels foo
   BESTAPP=FOO
   export BESTAPP

%appinstall foo
   touch foo.exec

%appenv foo
    SOFTWARE=foo
    export SOFTWARE

%apphelp foo
    This is the help for foo.

%appfiles foo
   avocados.txt


##############################
# bar
##############################

%apphelp bar
    This is the help for bar.

%applabels bar
   BESTAPP=BAR
   export BESTAPP

%appinstall bar
    touch bar.exec

%appenv bar
    SOFTWARE=bar
    export SOFTWARE
$ singularity apps roar.simg
bar
foo
Help me with bar!
$ singularity help --app bar roar.simg
This is the help for bar.
Run foo
singularity run --app foo roar.simg
RUNNING FOO
$ singularity exec --app foo roar.simg env | grep SOFTWARE
SOFTWARE=foo
$ singularity exec --app bar roar.simg env | grep SOFTWARE
SOFTWARE=bar
Examples
Best Practices for Build Recipes
When crafting your recipe, it is best to consider the following:
- To make your container internally modular, use a href=”#sec:scifapps”>SCI-F apps</a>. Shared dependencies (between app modules) can go under .
- For global installs to , install packages, programs, data, and files into operating system locations (e.g. not , , or any other directories that might get commonly binded on).
- Make your container speak for itself. If your runscript doesn’t spit out help, write a or or section. A good container tells the user how to interact with it.
- If you require any special environment variables to be defined, add them the and sections of the build recipe.
- Files should never be owned by actual users, they should always be owned by a system account (UID less than 500).
- Ensure that the container’s , , , and no other sensitive files have anything but the bare essentials within them.
- It is encouraged to build containers from a recipe instead of a sandbox that has been manually changed. This ensures greatest possibility of reproducibility and mitigates the black box effect.
Are you a recipe pro and now ready to build? Take a look at the a href=”#sec:buildcontainer”>build</a> documentation.
Singularity Flow
Building Images
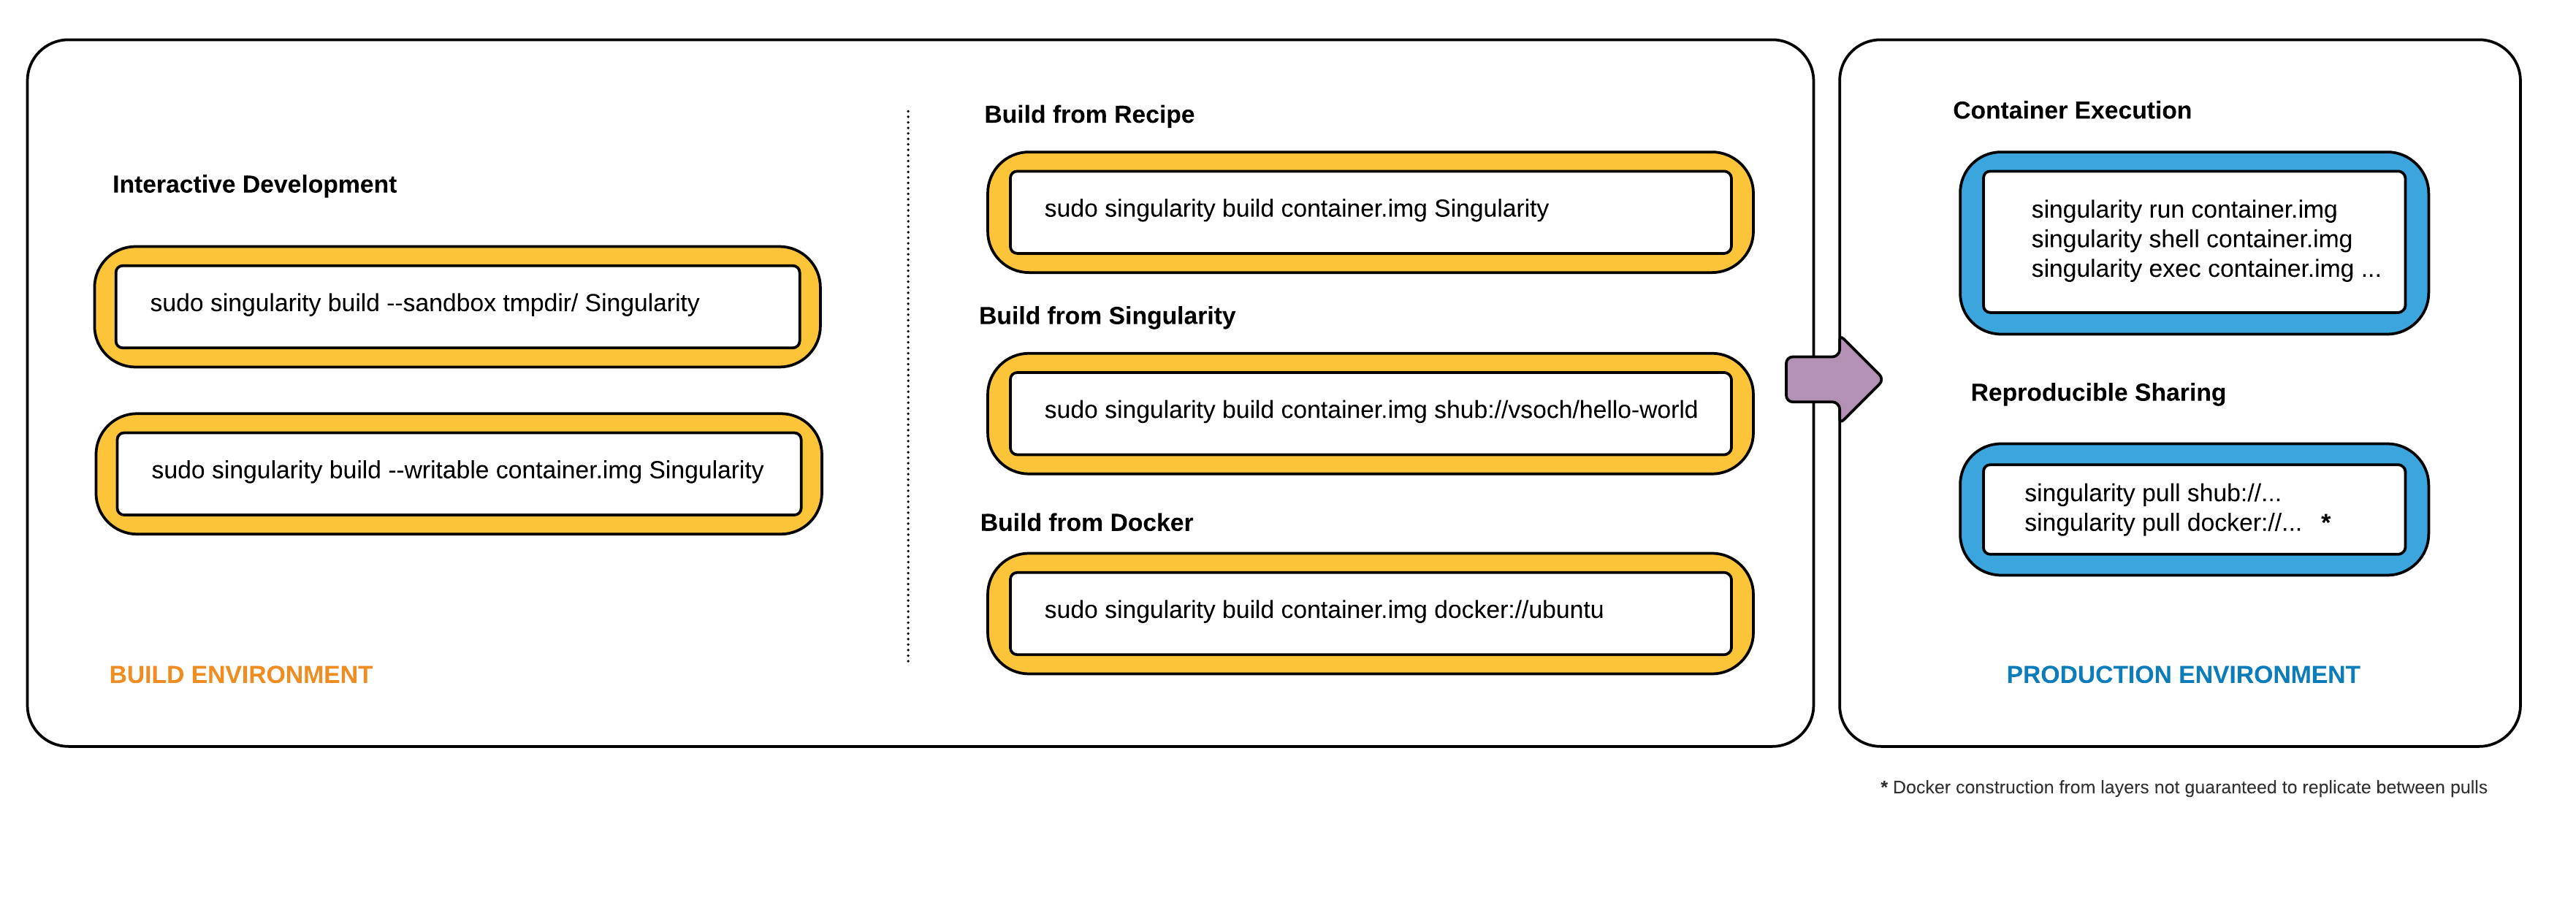
The diagram below is a visual depiction of how you can use Singularity to build images. The high level idea is that we have two environments:
- a build environment (where you have sudo privileges) to test and build your container
- a production environment where you run your container
Singularity production images are immutable. This is a feature added as of Singularity 2.4, and it ensures a higher level of reproducibility and verification of images. To read more about the details, check out the a href=”#sec:buildcontainer”>build</a> docs. However, immutability is not so great when you are testing, debugging, or otherwise want to quickly change your image. We will proceed by describing a typical workflow of developing first, building a final image, and using it in production.
If you want a writable image or folder for developing, you have two options:
- build into a directory that has writable permissions using the option
- build into an ext3 image file, that has writable permissions with the option
In both cases you will need to execute your container with the option at runtime for your changes to be persistent.
Sandbox Folder
$ sudo singularity build --sandbox ubuntu/ docker://ubuntu
Docker image path: index.docker.io/library/ubuntu:latest
Cache folder set to /root/.singularity/docker
Importing: base Singularity environment
Importing: /root/.singularity/docker/sha256:9fb6c798fa41e509b58bccc5c29654c3ff4648b608f5daa67c1aab6a7d02c118.tar.gz
Importing: /root/.singularity/docker/sha256:3b61febd4aefe982e0cb9c696d415137384d1a01052b50a85aae46439e15e49a.tar.gz
Importing: /root/.singularity/docker/sha256:9d99b9777eb02b8943c0e72d7a7baec5c782f8fd976825c9d3fb48b3101aacc2.tar.gz
Importing: /root/.singularity/docker/sha256:d010c8cf75d7eb5d2504d5ffa0d19696e8d745a457dd8d28ec6dd41d3763617e.tar.gz
Importing: /root/.singularity/docker/sha256:7fac07fb303e0589b9c23e6f49d5dc1ff9d6f3c8c88cabe768b430bdb47f03a9.tar.gz
Importing: /root/.singularity/metadata/sha256:22e289880847a9a2f32c62c237d2f7e3f4eae7259bf1d5c7ec7ffa19c1a483c8.tar.gz
Building image from sandbox: ubuntu/
Singularity container built: ubuntu/
 $ tree -L 1 ubuntu
ubuntu
├── bin
├── boot
├── dev
├── environment -> .singularity.d/env/90-environment.sh
├── etc
├── home
├── lib
├── lib64
├── media
├── mnt
├── opt
├── proc
├── root
├── run
├── sbin
├── singularity -> .singularity.d/runscript
├── srv
├── sys
├── tmp
├── usr
└── var
And you can shell into it just like a normal container.
$ singularity shell ubuntu
Singularity: Invoking an interactive shell within container...

Singularity ubuntu:~/Desktop> touch /hello.txt
touch: cannot touch '/hello.txt': Permission denied
$ sudo singularity shell ubuntu
Singularity: Invoking an interactive shell within container...

Singularity ubuntu:/home/vanessa/Desktop> touch /hello.txt
Writable Image
If you prefer to work with a writable image file rather than a directory, you can perform a similar development build and specify the option. This will produce an image that is writable with an ext3 file system. Unlike the sandbox, it is a single image file.
$ sudo singularity build --writable ubuntu.img docker://ubuntu
Docker image path: index.docker.io/library/ubuntu:latest
Cache folder set to /root/.singularity/docker
Importing: base Singularity environment
Importing: /root/.singularity/docker/sha256:9fb6c798fa41e509b58bccc5c29654c3ff4648b608f5daa67c1aab6a7d02c118.tar.gz
Importing: /root/.singularity/docker/sha256:3b61febd4aefe982e0cb9c696d415137384d1a01052b50a85aae46439e15e49a.tar.gz
Importing: /root/.singularity/docker/sha256:9d99b9777eb02b8943c0e72d7a7baec5c782f8fd976825c9d3fb48b3101aacc2.tar.gz
Importing: /root/.singularity/docker/sha256:d010c8cf75d7eb5d2504d5ffa0d19696e8d745a457dd8d28ec6dd41d3763617e.tar.gz
Importing: /root/.singularity/docker/sha256:7fac07fb303e0589b9c23e6f49d5dc1ff9d6f3c8c88cabe768b430bdb47f03a9.tar.gz
Importing: /root/.singularity/metadata/sha256:22e289880847a9a2f32c62c237d2f7e3f4eae7259bf1d5c7ec7ffa19c1a483c8.tar.gz
Building image from sandbox: /tmp/.singularity-build.VCHPpP
Creating empty Singularity writable container 130MB
Creating empty 162MiB image file: ubuntu.img
Formatting image with ext3 file system
Image is done: ubuntu.img
Building Singularity image...
Cleaning up...
Singularity container built: ubuntu.img
You can use this image with commands like , , , and if you want to change the image you must use the flag. As before, it’s a good idea to issue these commands as root to ensure you have the proper permissions to write.
$ sudo singularity shell --writable ubuntu.img

Development Tip! When building containers, it often is the case that
you will have a lot of testing of installation commands, and if
building a production image, one error will stop the entire build.
If you interactively write the build recipe with one of these
writable containers, you can debug as you go, and then build the
production (squashfs) container without worrying that it will error
and need to be started again.
Let’s set the scene - we just finished building our perfect hello world container. It does a fantastic hello-world analysis, and we have written a paper on it! We now want to build an immutable container - meaning that if someone obtained our container and tried to change it, they could not. They could easily use the same recipe that you used (it is provided as metadata inside the container), or convert your container to one of the writable formats above using . So your work can still be extended.
Recommended Production Build
What we want for production is a build into a squashfs image . Squashfs is a read only, and compressed filesystem, and well suited for confident archive and re-use of your hello-world. To build a production image, just remove the extra options:
sudo singularity build ubuntu.simg docker://ubuntu
Docker image path: index.docker.io/library/ubuntu:latest
Cache folder set to /root/.singularity/docker
Importing: base Singularity environment
Importing: /root/.singularity/docker/sha256:9fb6c798fa41e509b58bccc5c29654c3ff4648b608f5daa67c1aab6a7d02c118.tar.gz
Importing: /root/.singularity/docker/sha256:3b61febd4aefe982e0cb9c696d415137384d1a01052b50a85aae46439e15e49a.tar.gz
Importing: /root/.singularity/docker/sha256:9d99b9777eb02b8943c0e72d7a7baec5c782f8fd976825c9d3fb48b3101aacc2.tar.gz
Importing: /root/.singularity/docker/sha256:d010c8cf75d7eb5d2504d5ffa0d19696e8d745a457dd8d28ec6dd41d3763617e.tar.gz
Importing: /root/.singularity/docker/sha256:7fac07fb303e0589b9c23e6f49d5dc1ff9d6f3c8c88cabe768b430bdb47f03a9.tar.gz
Importing: /root/.singularity/metadata/sha256:22e289880847a9a2f32c62c237d2f7e3f4eae7259bf1d5c7ec7ffa19c1a483c8.tar.gz
Building Singularity image...
Cleaning up...
Singularity container built: ubuntu.simg
Production Build from Sandbox
We understand that it might be wanted to build a Singularity (squashfs) from a previous development image. While we advocate for the first approach, we support this use case. To do this, given our folder called “ubuntu/” we made above:
sudo singularity build ubuntu.simg ubuntu/
Bind Paths and Mounts
If enabled by the system administrator, Singularity allows you to map directories on your host system to directories within your container using bind mounts. This allows you to read and write data on the host system with ease.
Overview
When Singularity ‘swaps’ the host operating system for the one inside your container, the host file systems becomes inaccessible. But you may want to read and write files on the host system from within the container. To enable this functionality, Singularity will bind directories back in via two primary methods: system-defined bind points and conditional user-defined bind points.
The system administrator has the ability to define what bind points will be included automatically inside each container. The bind paths are locations on the host’s root file system which should also be visible within the container. Some of the bind paths are automatically derived (e.g. a user’s home directory) and some are statically defined (e.g. bind path in the Singularity configuration file). In the default configuration, the directories , , , , and are among the system-defined bind points.
Specifying Bind Paths
$ singularity shell -B /tmp:/scratch /tmp/Centos7-ompi.img
Singularity: Invoking an interactive shell within container...

Singularity.Centos7-ompi.img> ls /scratch
ssh-7vywtVeOez  systemd-private-cd84c81dda754fe4a7a593647d5a5765-ntpd.service-12nMO4
$ singularity shell -B /opt,/data:/mnt /tmp/Centos7-ompi.img
This will bind on the host to in the container and on the host to in the container. Using the environment variable instead of the command line argument, this would be:
$ export SINGULARITY_BINDPATH="/opt,/data:/mnt"
$ singularity shell /tmp/Centos7-ompi.img
Using the environment variable , you can bind directories even when you are running your container as an executable file with a runscript. If you bind many directories into your Singularity containers and they don’t change, you could even benefit by setting this variable in your file.
Binding with Overlay
If a bind path is requested and the bind point does not exist within the container, a warning message will be displayed and Singularity will continue trying to start the container. For example:
$ singularity shell --bind /global /tmp/Centos7-ompi.img
WARNING: Non existent bind point (directory) in container: '/global'
Singularity: Invoking an interactive shell within container...

Singularity.Centos7-ompi.img>
Even though did not exist inside the container, the shell command printed a warning but continued on. If overlay is available and enabled, you will find that we no longer get the error and is created and accessible as expected:
$ singularity shell --bind /global /tmp/Centos7-ompi.img
Singularity: Invoking an interactive shell within container...

Singularity.Centos7-ompi.img>
In this case, Singularity dynamically created the necessary bind point in your container. Without overlay, you would have needed to manually create the directory inside your container.
Persistent Overlays
Persistent overlay images are new to version 2.4! This feature allows you to overlay a writable file system on an immutable read-only container for the illusion of read-write access.
Overview
Usage
To use a persistent overlay, you must first have a container.
$ singularity build ubuntu.simg shub://GodloveD/ubuntu
Then you must create a writable, ext3 image. We can do so with the command:
$ singularity image.create my-overlay.img
Now you can use this overlay image with your container. Note that it is not necessary to be root to use an overlay partition, but this will ensure that we have write privileges where we want them.
$ sudo singularity shell --overlay my-overlay.img ubuntu.simg
Singularity ubuntu.simg:~> touch /foo
Singularity ubuntu.simg:~> apt-get install -y vim
Singularity ubuntu.simg:~> which vim
/usr/bin/vim
Singularity ubuntu.simg:~> exit
$ sudo singularity shell --overlay my-overlay.img ubuntu.simg
Singularity ubuntu.simg:~> ls /foo
/foo
Singularity ubuntu.simg:~> which vim
/usr/bin/vim
Singularity ubuntu.simg:~> exit
If you mount your container without the option, your changes will be gone.
$ sudo singularity shell ubuntu.simg
Singularity ubuntu.simg:~> ls /foo
ls: cannot access 'foo': No such file or directory
Singularity ubuntu.simg:~> which vim
Singularity ubuntu.simg:~> exit
Running Services
Singularity 2.4 introduces the ability to run “container instances”, allowing you to run services (e.g. Nginx, MySQL, etc…) using Singularity. A container instance, simply put, is a persistent and isolated version of the container image that runs in the background.
Why container instances?
that is pretty simple, I install nginx and start the service:
apt-get update && apt-get install -y nginx
service nginx start
Container Instances in Singularity
With Singularity 2.4 and the addition of container instances, the ability to cleanly, reliably, and safely run services in a container is here. First, let’s put some commands that we want our instance to execute into a script. Let’s call it a . This fits into a definition file like so:
%startscript

service nginx start
Now let’s say we build a container with that startscript into an image called and we want to run an nginx service. All we need to do is start the instance with the command, and the startscript will run inside the container automatically:
              [command]        [image]    [name of instance]
$ singularity instance.start   nginx.img  web
When we run that command, Singularity creates an isolated environment for the container instances’ processes/services to live inside. We can confirm that this command started an instance by running the instance.list command like so:
$ singularity instance.list
INSTANCE NAME    PID      CONTAINER IMAGE
web              790      /home/mibauer/nginx.img
If we want to run multiple instances from the same image, it’s as simple as running the command multiple times. The instance names are an identifier used to uniquely describe an instance, so they cannot be repeated.
$ singularity instance.start   nginx.img  web1
$ singularity instance.start   nginx.img  web2
$ singularity instance.start   nginx.img  web3
And again to confirm that the instances are running as we expected:
$ singularity instance.list
INSTANCE NAME    PID      CONTAINER IMAGE
web1             790      /home/mibauer/nginx.img
web2             791      /home/mibauer/nginx.img
web3             792      /home/mibauer/nginx.img
If the service you want to run in your instance requires a bind mount, then you must pass the option when calling . For example, if you wish to capture the output of the container instance which is placed at inside the container you could do:
$ singularity instance.start -B output/dir/outside/:/output/ nginx.img web1
If you want to poke around inside of your instance, you can do a normal command, but give it the instance URI:
$ singularity shell instance://web1
Singularity: Invoking an interactive shell within container...

Singularity pdf_server.img:~/>
Similarly, you can use the commands on instances:
$ singularity run instance://web1
$ singularity exec instance://web1 ps -ef
When using with an instance URI, the will be executed inside of the instance. Similarly with , it will execute the given command in the instance.
When you are finished with your instance you can clean it up with the command like so:
$ singularity instance.stop web1
$ singularity instance.stop \*
$ singularity instance.stop -a
Note that you must escape the wildcard with a backslash like this to pass it properly.
Nginx “Hello-world” in Singularity
Let’s take a look at setting up a sample nginx web server using instances in Singularity. First we will just create a basic definition file:
Bootstrap: docker
From: nginx
Includecmd: no

%startscript
    nginx
All this does is download the official nginx Docker container, convert it to a Singularity image, and tell it to run nginx when you start the instance. Since we’re running a web server, we’re going to run the following commands as root.
# singularity build nginx.img Singularity
# singularity instance.start nginx.img web1
Just like that we’ve downloaded, built, and ran an nginx Singularity image. And to confirm that it’s correctly running:
$ curl localhost
127.0.0.1 - - [06/Oct/2017:21:46:43 +0000] "GET / HTTP/1.1" 200 612 "-" "curl/7.47.0" "-"
<!DOCTYPE html>
<html>
<head>
<title>Welcome to nginx!</title>
<style>
    body {
        width: 35em;
        margin: 0 auto;
        font-family: Tahoma, Verdana, Arial, sans-serif;
    }
</style>
</head>
<body>
<h1>Welcome to nginx!</h1>
<p>If you see this page, the nginx web server is successfully installed and
working. Further configuration is required.</p>

<p>For online documentation and support please refer to
<<a href="#http://nginx.org/">nginx.org</a>.<br/>
Commercial support is available at
<<a href="#http://nginx.com/">nginx.com</a>.</p>

<p><em>Thank you for using nginx.</em></p>
</body>
</html>
Putting all together
In this section, we will demonstrate an example of packaging a service into a container and running it. The service we will be packaging is an API server that converts a web page into a PDF, and can be found here. The final example can be found here on GitHub, and here on SingularityHub. If you wish to just download the final image directly from Singularity Hub, simply run .
Building the image
To begin, we need to build the image. When looking at the GitHub page of the , we can see that it is a Node 8 server that uses headless Chromium called Puppeteer. Let’s first choose a base from which to build our container, in this case I used the docker image which comes pre-installed with Node 8:
Bootstrap: docker
From: node:8
Includecmd: no
%post
     apt-get update
     apt-get install -yq gconf-service libasound2 libatk1.0-0 libc6 libcairo2 libcups2 \
     libdbus-1-3 libexpat1 libfontconfig1 libgcc1 libgconf-2-4 libgdk-pixbuf2.0-0 \
     libglib2.0-0 libgtk-3-0 libnspr4 libpango-1.0-0 libpangocairo-1.0-0 libstdc++6 \
     libx11-6 libx11-xcb1 libxcb1 libxcomposite1 libxcursor1 libxdamage1 libxext6 \
     libxfixes3 libxi6 libxrandr2 libxrender1 libxss1 libxtst6 ca-certificates \
     fonts-liberation libappindicator1 libnss3 lsb-release xdg-utils wget curl
     rm -r /var/lib/apt/lists/*
     cd /
     git clone https://github.com/alvarcarto/url-to-pdf-api.git pdf_server
     cd pdf_server
     npm install
     chmod -R 0755 .
And now we need to define what happens when we start an instance of the container. In this situation, we want to run the commands that starts up the url-to-pdf-api server:
%startscript
    cd /pdf_server
    # Use nohup and /dev/null to completely detach server process from terminal
    nohup npm start > /dev/null 2>&1 < /dev/null &
Also, the server requires some variables be set, which we can do in the environment section:
%environment
    NODE_ENV=development
    PORT=8000
    ALLOW_HTTP=true
    URL=localhost
    export NODE_ENV PORT ALLOW_HTTP URL
Now we can build the definition file into an image! Simply run and the image will be ready to go:
$ sudo singularity build url-to-pdf-api.img Singularity
Running the Server
Now that we have an image, we are ready to start an instance and run the server:
$ singularity instance.start url-to-pdf-api.img pdf
We can confirm it’s working by sending the server an http request using curl:
$ curl -o google.pdf localhost:8000/api/render?url=http://google.com
  % Total    % Received % Xferd  Average Speed   Time    Time     Time  Current
                                 Dload  Upload   Total   Spent    Left  Speed
100 51664  100 51664    0     0  12443      0  0:00:04  0:00:04 --:--:-- 12446
If you shell into the instance, you can see the running processes:
$ singularity shell instance://pdf
Singularity: Invoking an interactive shell within container...

Singularity pdf_server.img:~/bauerm97/instance-example> ps auxf
USER       PID %CPU %MEM    VSZ   RSS TTY      STAT START   TIME COMMAND
node        87  0.2  0.0  20364  3384 pts/0    S    16:16   0:00 /bin/bash --norc
node        88  0.0  0.0  17496  2144 pts/0    R+   16:16   0:00  \_ ps auxf
node         1  0.0  0.0  13968  1904 ?        Ss   16:10   0:00 singularity-instance: mibauer [pdf]
node         3  0.1  0.4 997452 40364 ?        Sl   16:10   0:00 npm
node        13  0.0  0.0   4340   724 ?        S    16:10   0:00  \_ sh -c nodemon --watch ./src -e j
node        14  0.0  0.4 1184492 37008 ?       Sl   16:10   0:00      \_ node /scif/apps/pdf_server/p
node        26  0.0  0.0   4340   804 ?        S    16:10   0:00          \_ sh -c node src/index.js
node        27  0.2  0.5 906108 43424 ?        Sl   16:10   0:00              \_ node src/index.js
Singularity pdf_server.img:~/bauerm97/instance-example> ls
LICENSE  README.md  Singularity  out  pdf_server.img
Singularity pdf_server.img:~/bauerm97/instance-example> exit
Making it Pretty
%appinstall pdf_server
    git clone https://github.com/alvarcarto/url-to-pdf-api.git pdf_server
    cd pdf_server
    npm install
    chmod -R 0755 .
And update our to point to the app location:
%startscript
    cd "${APPROOT_pdf_server}/pdf_server"
    # Use nohup and /dev/null to completely detach server process from terminal
    nohup npm start > /dev/null 2>&1 < /dev/null &
Now we want to define the pdf_client app, which we will run to send the requests to the server:
%apprun pdf_client
    if [ -z "${1:-}" ]; then
        echo "Usage: singularity run --app pdf <instance://name> <URL> [output file]"
        exit 1
    fi
    curl -o "${SINGULARITY_APPDATA}/output/${2:-output.pdf}" "${URL}:${PORT}/api/render?url=${1}"
As you can see, the app checks to make sure that the user provides at least one argument. Now that we have an output directory in the container, we need to expose it to the host using a bind mount. Once we’ve rebuilt the container, make a new directory callout for the generated PDF’s to go. Now we simply start the instance like so:
$ singularity instance.start -B out/:/scif/data/pdf_client/output/ url-to-pdf-api.img pdf
And to request a pdf simply do:
$ singularity run --app pdf_client instance://pdf http://google.com google.pdf
And to confirm that it worked:
$ ls out/
google.pdf
When you are finished, use the instance.stop command to close all running instances.
$ singularity instance.stop \*
Important Notes
- The instances are linked with your user. So if you start an instance with sudo, that is going to go under root, and you will need to call in order to see it.
Container Checks
$ singularity check ubuntu.img
$ singularity check --tag default ubuntu.img
Perform checks with tag “clean”
$ singularity check --tag clean ubuntu.img
Tags and Organization
Currently, checks are organized by tag and security level. If you know a specific tag that you want to use, for example “docker” deploys checks for containers with Docker imported layers, you can specify the tag:
USAGE

    -t/--tag       tag to filter checks. default is "default"
                      Available: default, security, docker, clean


EXAMPLE

$ singularity check --tag docker ubuntu.img
If you want to run checks associated with a different security level, you can specify with , , or :
USAGE: singularity [...] check [exec options...] <container path>

This command will run security checks for an image.
Note that some checks require sudo.

    -l/--low       Specify low threshold (all checks, default)
    -m/--med       Perform medium and high checks
    -h/--high      Perform only checks at level high
Note that some checks will require sudo, and you will be alerted if this is the case and you didn’t use it. Finally, if you want to run all default checks, just don’t specify a tag or level.
What checks are available?
Currently, you can view all installable checks here, and we anticipate adding an ability to view tags that are available, along with your own custom checks. You should also ask your administration if new checks have been added not supported by Singularity. If you want to request adding a new check, please tell us!.
Environment and Metadata
Singularity containers support environment variables and labels that you can add to your container during the build process. This page details general information about defining environments and labels. If you are looking for specific environment variables for build time, see build environment.
Environment
If you build a container from Singularity Hub or Docker Hub, the environment will be included with the container at build time. You can also define custom environment variables in your Recipe file like so:
Bootstrap: shub
From: vsoch/hello-world

%environment
    VARIABLE_NAME=VARIABLE_VALUE
    export VARIABLE_NAME
%post
    echo 'export VARIABLE_NAME=VARIABLE_VALUE' >>$SINGULARITY_ENVIRONMENT
$ SINGULARITYENV_HELLO=WORLD singularity exec --cleanenv centos7.img env
HELLO=WORLD
LD_LIBRARY_PATH=:/usr/local/lib:/usr/local/lib64
SINGULARITY_NAME=test.img
PATH=/usr/local/sbin:/usr/local/bin:/usr/sbin:/usr/bin:/sbin:/bin
PWD=/home/gmk/git/singularity
LANG=en_US.UTF-8
SHLVL=0
SINGULARITY_INIT=1
SINGULARITY_CONTAINER=test.img
- to prepend directories to the beginning of the
- to append directories to the end of the
- to override the within the container
Labels
$ singularity inspect dino.img
{
    "org.label-schema.usage.singularity.deffile.bootstrap": "docker",
    "MAINTAINER": "Vanessasaurus",
    "org.label-schema.usage.singularity.deffile": "Singularity.help",
    "org.label-schema.usage": "/.singularity.d/runscript.help",
    "org.label-schema.schema-version": "1.0",
    "org.label-schema.usage.singularity.deffile.from": "ubuntu:latest",
    "org.label-schema.build-date": "2017-07-28T22:59:17-04:00",
    "org.label-schema.usage.singularity.runscript.help": "/.singularity.d/runscript.help",
    "org.label-schema.usage.singularity.version": "2.3.1-add/label-schema.g00f040f",
    "org.label-schema.build-size": "715MB"
}
You will notice that the one label doesn’t belong to the label schema, . This was a user provided label during bootstrap. Finally, for Singularity versions >= 2.4, the image build size is added as a label, , and the label schema is used throughout. For versions earlier than 2.4, containers did not use the label schema, and looked like this:
singularity exec centos7.img cat /.singularity.d/labels.json
{ "name":
      "CentOS Base Image",
       "build-date": "20170315",
       "vendor": "CentOS",
       "license": "GPLv2"
}
You can add custom labels to your container in a bootstrap file:
Bootstrap: docker
From: ubuntu: latest

%labels

AUTHOR Vanessasaur
The command is useful for viewing labels and other container meta-data.
Container Metadata
Inside of the container, metadata is stored in the directory. You probably shouldn’t edit any of these files directly but it may be helpful to know where they are and what they do:
/.singularity.d/
├── actions
│   ├── exec
│   ├── run
│   ├── shell
│   ├── start
│   └── test
├── env
│   ├── 01-base.sh
│   ├── 90-environment.sh
│   ├── 95-apps.sh
│   └── 99-base.sh
├── labels.json
├── libs
├── runscript
├── Singularity
└── startscript
- actions: This directory contains helper scripts to allow the container to carry out the action commands.
- env: All *.sh files in this directory are sourced in alpha-numeric order when the container is initiated. For legacy purposes there is a symbolic link called that points to .
- labels.json: The json file that stores a containers labels described above.
- libs: At runtime the user may request some host-system libraries to be mapped into the container (with the option for example). If so, this is their destination.
- runscript: The commands in this file will be executed when the container is invoked with the command or called as an executable. For legacy purposes there is a symbolic link called that points to this file
- Singularity: This is the Recipe file that was used to generate the container. If more than 1 Recipe file was used to generate the container additional Singularity files will appear in numeric order in a sub-directory called
- startscript: The commands in this file will be executed when the container is invoked with the command.
Reproducible SCI-F Apps
Why do we need SCI-F?
%post

# install dependencies 1
# install software A (foo)
# install software B (bar)
# install software C (foo)
# install software D (bar)
The creator may know that A and C were installed for and B and D for , but down the road, when someone discovers the container, if they can find the software at all, the intention of the container creator would be lost. As many are now, containers without any form of internal organization and predictability are black boxes. We don’t know if some software installed to , or to , or to their custom favorite folder . We could assume that the creator added important software to the path and look in these locations, but that approach is still akin to fishing in a swamp. We might only hope that the container’s main function, the Singularity runscript, is enough to make the container perform as intended.
%runscript

if some logic to choose foo:
   check arguments for foo
   run foo
else if some logic to choose bar:
   run bar
and maybe your environment looks like this:
%environment
    BEST_GUY=foo
    export BEST_GUY
%environment
    BEST_GUY=foo
    BEST_GUY=bar
    export BEST_GUY
- You have to do a lot of manual work to expose the different software to the user via a custom runscript (and be a generally decent programmer).
- All software must share the same metadata, environment, and labels.
Under these conditions, containers are at best block boxes with unclear delineation between software provided, and only one context of running anything. The container creator shouldn’t need to spend inordinate amounts of time writing custom runscripts to support multiple functions and inputs. Each of and should be easy to define, and have its own runscript, environment, labels, tests and help section.
SCI-F Apps make and transparent, and solve this problem of mixed up modules. Our simple issue of mixed up modules could be solved if we could do this:
Bootstrap:docker
From: ubuntu:16.04

%appenv foo
    BEST_GUY=foo
    export BEST_GUY

%appenv bar
    BEST_GUY=bar
    export BEST_GUY

%apprun foo
    echo The best guy is $BEST_GUY

%apprun bar
    echo The best guy is $BEST_GUY
Generate the container
$ sudo singularity build foobar.simg Singularity
and run it in the context of and then
$ singularity run --app bar foobar.simg
The best guy is bar
$ singularity run --app foo foobar.simg
The best guy is foo
Using SCI-F apps, a user can easily discover both and without knowing anything about the container:
singularity apps foobar.simg
bar
foo
singularity inspect --app foo  foobar.simg
{
    "SCIF_APP_NAME": "foo",
    "SCIF_APP_SIZE": "1MB"
}
What is going on, under the hood? Just a simple, clean organization that is tied to a set of sections in the build recipe relevant to each app. For example, I can specify custom install procedures (and they are relevant to each app’s specific base defined under ), labels, tests, and help sections. Before I tell you about the sections, I’ll briefly show you what the organization looks like, for each app:
/scif/apps/

     foo/
        bin/
        lib/
        scif/
            runscript.help
            runscript
            env/
                01-base.sh
                90-environment.sh

     bar/

     ....
If you are familiar with Singularity, the above will look very familiar. It mirrors the Singularity (main container) metadata folder, except instead of we have . The name and base is chosen intentionally to be something short, and likely to be unique. On the level of organization and metadata, these internal apps are like little containers! Are you worried that you need to remember all this path nonsense? Don’t worry, you don’t. You can just use environment variables in your runscripts, etc. Here we are looking at the environment active for lolcat:
singularity exec --app foo foobar.simg env | grep foo
Let’s talk about the output of the above in sections, you will notice some interesting things! First, notice that the app’s has been added to the path, and it’s added to the . This means that anything you drop in either will automatically be added. You don’t need to make these folders either, they are created for you.
LD_LIBRARY_PATH=/scif/apps/foo/lib::/.singularity.d/libs
PATH=/scif/apps/foo/bin:/scif/apps/foo:/usr/local/sbin:/usr/local/bin:/usr/sbin:/usr/bin:/sbin:/bin
Next, notice that we have environment variables relevant to the active app’s (foo) data and metadata. They look like this:
SCIF_APPOUTPUT=/scif/data/foo/output
SCIF_APPDATA=/scif/data/foo
SCIF_APPINPUT=/scif/data/foo/input
SCIF_APPMETA=/scif/apps/foo/scif
SCIF_APPROOT=/scif/apps/foo
SCIF_APPNAME=foo
We also have foo’s environment variables defined under , and importantly, we don’t see bar’s.
BEST_GUY=foo
Also provided are more global paths for data and apps:
SCIF_APPS=/scif/apps
SCIF_DATA=/scif/data
%appfiles foo
    runfoo.sh   bin/runfoo.sh
and then maybe for install I’d make it executable
%appinstall foo
    chmod u+x bin/runfoo.sh
You don’t even need files! You could just do this.
%appinstall foo
    echo 'echo "Hello Foo."' >> bin/runfoo.sh
    chmod u+x bin/runfoo.sh
We can summarize these observations about using apps:
- the specific environment () is active because is foo
- the lib folder in foo’s base is added to the LD_LIBRARY_PATH
- the bin folder is added to the path
- locations for input, output, and general data are exposed. It’s up to you how you use these, but you can predictably know that a well made app will look for inputs and outputs in it’s specific folder.
- environment variables are provided for the app’s root, it’s data, and it’s name
I didn’t show you the complete output of a to the environment when running foo in the first example - because the remainder of variables are more fit for a discussion about app interaction. Essentially, when any app is active, we also have named variable that can explicitly reference the environment file, labels file, runscript, and folders for all app’s in the container. For our above Singularity Recipe, we would also find:
SCIF_APPDATA_bar=/scif/data/bar
SCIF_APPRUN_bar=/scif/apps/bar/scif/runscript
SCIF_APPROOT_bar=/scif/apps/bar
SCIF_APPLIB_bar=/scif/apps/bar/lib
SCIF_APPMETA_bar=/scif/apps/bar/scif
SCIF_APPBIN_bar=/scif/apps/bar/bin
SCIF_APPENV_bar=/scif/apps/bar/scif/env/90-environment.sh
SCIF_APPLABELS_bar=/scif/apps/bar/scif/labels.json

SCIF_APPENV_foo=/scif/apps/foo/scif/env/90-environment.sh
SCIF_APPLABELS_foo=/scif/apps/foo/scif/labels.json
SCIF_APPDATA_foo=/scif/data/foo
SCIF_APPRUN_foo=/scif/apps/foo/scif/runscript
SCIF_APPROOT_foo=/scif/apps/foo
SCIF_APPLIB_foo=/scif/apps/foo/lib
SCIF_APPMETA_foo=/scif/apps/foo/scif
SCIF_APPBIN_foo=/scif/apps/foo/bin
This is really great because it means that we can have apps interact with one another internally. For example, let’s modify the recipe a bit:
Bootstrap:docker
From: ubuntu:16.04

%appenv cow
    ANIMAL=COW
    NOISE=moo
    export ANIMAL NOISE

%appenv bird
    NOISE=tweet
    ANIMAL=BIRD
    export ANIMAL

%apprun moo
    echo The ${ANIMAL} goes ${NOISE}

%appenv moo
    . ${APPENV_cow}
In the above example, we have three apps. One for a cow, one for a bird, and a third that depends on the cow. We can’t define global functions or environment variables (in or , respectively) because they would interfere with the third app, bird, that has equivalently named variables. What we do then, is source the environment for “cow” in the environment for “moo” and the result is what we would want:
$ singularity run --app moo /tmp/one.simg
The COW goes moo
- **SCIF_APPBIN_*: the path to the bin folder, if you want to add an app that isn’t active to your ‘PATH‘
- **SCIF_APPLIB_*: the path to the lib folder, if you want to add an app that isn’t active to your ‘LD_LIBRARY_PATH‘
- **SCIF_APPRUN_*: the app’s runscript (so you can call it from elsewhere)
- **SCIF_APPMETA_*: the path to the metadata folder for the app
- **SCIF_APPENV_*: the path to the primary environment file (for sourcing) if it exists
- **SCIF_APPROOT_*: the app’s install folder
- **SCIF_APPDATA_*: the app’s data folder
- **SCIF_APPLABELS_*: The path to the label.json in the metadata folder, if it exists
Singularity containers are already reproducible in that they package dependencies. This basic format adds to that by making the software inside of them modular, predictable, and programmatically accessible. We can say confidently that some set of steps, labels, or variables in the runscript is associated with a particular action of the container. We can better reveal how dependencies relate to each step in a scientific workflow. Making containers is not easy. When a scientist starts to write a recipe for his set of tools, he probably doesn’t know where to put it, perhaps that a help file should exist, or that metadata about the software should be served by the container. If container generation software made it easy to organize and capture container content automatically, we would easily meet these goals of internal modularity and consistency, and generate containers that easily integrate with external hosts, data, and other containers. These are essential components for (ultimately) optimizing the way we develop, understand, and execute our scientific containers.
Cowsay Container
wget https://raw.githubusercontent.com/singularityware/singularity/master/examples/apps/Singularity.cowsay
sudo singularity build moo.simg Singularity.cowsay
What apps are installed?
singularity apps moo.simg
cowsay
fortune
lolcat
Ask for help for a specific app!
singularity help --app fortune moo.simg
fortune is the best app
for app in $(singularity apps moo.simg)
   do
     singularity help --app $app moo.simg
done
cowsay is the best app
fortune is the best app
lolcat is the best app
singularity run --app fortune moo.simg
    My dear People.
    My dear Bagginses and Boffins, and my dear Tooks and Brandybucks,
and Grubbs, and Chubbs, and Burrowses, and Hornblowers, and Bolgers,
Bracegirdles, Goodbodies, Brockhouses and Proudfoots.  Also my good
Sackville Bagginses that I welcome back at last to Bag End.  Today is my
one hundred and eleventh birthday: I am eleventy-one today!"
        -- J. R. R. Tolkien
singularity run --app fortune moo.simg | singularity run --app lolcat moo.simg
You will be surrounded by luxury.
This one might be easier to see - pipe the same fortune into the cowsay app:
singularity run --app fortune moo.simg | singularity run --app cowsay moo.simg
 ________________________________________
/ Executive ability is prominent in your \
\ make-up.                               /
 ----------------------------------------
        \   ^__^
         \  (oo)\_______
            (__)\       )\/\
                ||----w |
                ||     ||
and the final shabang - do the same, but make it colored. Let’s even get lazy and use an environment variable for the command:
CMD="singularity run --app"
$CMD fortune moo.simg | $CMD cowsay moo.simg | $CMD lolcat moo.simg
 _________________________________________
/ Ships are safe in harbor, but they were \
\ never meant to stay there.              /
 -----------------------------------------
        \   ^__^
         \  (oo)\_______
            (__)\       )\/\
                ||----w |
                ||     ||
Yes, you need to watch the asciinema to see the colors. Finally, inspect an app:
singularity inspect --app fortune moo.simg
{
    "SCIF_APP_NAME": "fortune",
    "SCIF_APP_SIZE": "1MB"
}
Singularity and Docker
Singularity is good friends with Docker. The reason is because the developers use and really like using Docker, and scientists have already put much resources into creating Docker images. Thus, one of our early goals was to support Docker. What can you do?
- You don’t need Docker installed
- You can shell into a Singularity-ized Docker image
- You can run a Docker image instantly as a Singularity image
- You can pull a Docker image (without sudo)
- You can build images with bases from assembled Docker layers that include environment, guts, and labels
TLDR (Too Long Didn’t Read
You can shell, import, run, and exec.
singularity shell docker://ubuntu:latest
singularity run docker://ubuntu:latest
singularity exec docker://ubuntu:latest echo "Hello Dinosaur!"

singularity pull docker://ubuntu:latest
singularity build ubuntu.img docker://ubuntu:latest
Import a Docker image into a Singularity Image
The core of a Docker image is basically a compressed set of files, a set of that (if you look in your Docker image folder on your host machine, you will see. The Docker Registry, which you probably interact with via Docker Hub, serves these layers. These are the layers that you see downloading when you interact with the docker daemon. We are going to use these same layers for Singularity!
Quick Start: The Docker Registry
singularity pull docker://ubuntu
WARNING: pull for Docker Hub is not guaranteed to produce the
WARNING: same image on repeated pull. Use Singularity Registry
WARNING: (shub://) to pull exactly equivalent images.
Docker image path: index.docker.io/library/ubuntu:latest
Cache folder set to /home/vanessa/.singularity/docker
[5/5] |===================================| 100.0%
Importing: base Singularity environment
Importing: /home/vanessa/.singularity/docker/sha256:9fb6c798fa41e509b58bccc5c29654c3ff4648b608f5daa67c1aab6a7d02c118.tar.gz
Importing: /home/vanessa/.singularity/docker/sha256:3b61febd4aefe982e0cb9c696d415137384d1a01052b50a85aae46439e15e49a.tar.gz
Importing: /home/vanessa/.singularity/docker/sha256:9d99b9777eb02b8943c0e72d7a7baec5c782f8fd976825c9d3fb48b3101aacc2.tar.gz
Importing: /home/vanessa/.singularity/docker/sha256:d010c8cf75d7eb5d2504d5ffa0d19696e8d745a457dd8d28ec6dd41d3763617e.tar.gz
Importing: /home/vanessa/.singularity/docker/sha256:7fac07fb303e0589b9c23e6f49d5dc1ff9d6f3c8c88cabe768b430bdb47f03a9.tar.gz
Importing: /home/vanessa/.singularity/metadata/sha256:77cece4ce6ef220f66747bb02205a00d9ca5ad0c0a6eea1760d34c744ef7b231.tar.gz
WARNING: Building container as an unprivileged user. If you run this container as root
WARNING: it may be missing some functionality.
Building Singularity image...
Cleaning up...
Singularity container built: ./ubuntu.img
The warnings mean well - it is to tell you that you are creating the image on the fly from layers, and if one of those layers changes, you won’t produce the same image next time.
The Build Specification file, Singularity
Just like Docker has the Dockerfile, Singularity has a file called Singularity that (currently) applications like Singularity Hub know to sniff for. For reproducibility of your containers, our strong recommendation is that you build from these files. Any command that you issue to change a container sandbox (building with ) or to a build with is by default not recorded, and your container loses its reproducibility. So let’s talk about how to make these files! First, let’s look at the absolute minimum requirement:
Bootstrap: docker
From: ubuntu
We would save this content to a file called Singularity and then issue the following commands to bootstrap the image from the file
sudo singularity build ubuntu.img Singularity
Do you want to specify a particular tag? or version? You can just add that to the docker uri:
Bootstrap: docker
From: ubuntu:latest
Note that the default is . If you want to customize the Registry or Namespace, just add those to the header:
Bootstrap: docker
From: ubuntu
Registry: pancakes.registry.index.io
Namespace: blue/berry/cream
The power of build comes with the other stuff that you can do! This means running specific install commands, specifying your containers runscript (what it does when you execute it), adding files, labels, and customizing the environment. Here is a full Singularity file:
Bootstrap: docker
From: tensorflow/tensorflow:latest

%runscript

    exec /usr/bin/python "$@"

%post

    echo "Post install stuffs!"

%files

/home/vanessa/Desktop/analysis.py /tmp/analysis.py
relative_path.py /tmp/analysis2.py

%environment
TOPSECRET=pancakes
HELLO=WORLD
export HELLO TOPSECRET

%labels

AUTHOR Vanessasaur
In the example above, I am overriding any Dockerfile or because I have defined a . If I want the Dockerfile to take preference, I would remove the section. If I want to use instead of , I would again remove the runscript, and add IncludeCmd to the header:
Bootstrap: docker
From: tensorflow/tensorflow:latest
IncludeCmd: yes

%post

    echo "Post install stuffs!"
Did you know that you can commit this Singularity file to a GitHub repo and it will automatically build for you when you push to `Singularity Hub`_?. This will ensure maximum reproducibility of your work.
How does the runscript work?
A is to provide defaults for an executing container.
An helps you to configure a container that you can run as an executable.
Given the definition, the is most appropriate for the Singularity , and so using the default bootstrap (whether from a endpoint or a spec file) will set the variable as the runscript. You can change this behavior by specifying in the Spec file (see below). If you provide any sort of in your Spec file, this overrides anything provided in Docker. In summary, the order of operations is as follows:
- If a is specified in the Singularity spec file, this takes prevalence over all
- If no is specified, or if the command is used as in the example above, the is used as runscript.
- If no is specified, but the user has a spec with , then the Docker is used.
- If no is specified, and there is no or , the image’s default execution action is to run the bash shell.
How do I specify my Docker image?
In the example above, you probably saw that we referenced the docker image first with the uri and that is important to tell Singularity that it will be pulling Docker layers. To ask for ubuntu, we asked for . This uri that we give to Singularity is going to be very important to choose the following Docker metadata items:
- registry (e.g., “index.docker.io”)
- namespace (e.g., “library”)
- repository (e.g., “ubuntu”)
- tag (e.g., “latest”) OR version (e.g., “@sha256:1234…)
When we put those things together, it looks like this:
docker://<registry>/<namespace>/<repo_name>:<repo_tag>
By default, the minimum requirement is that you specify a repository name (eg, ubuntu) and it will default to the following:
docker://index.docker.io/library/ubuntu:latest
If you provide a version instead of a tag, that will be used instead:
docker://index.docker.io/library/ubuntu@sha256:1235...
Bootstrap: docker
From: ubuntu
Registry: index.docker.io
Namespace: library
Custom Authentication
You can simply specify your additional authentication parameters in the header with the labels and :
Username: vanessa
Password: [password]
export SINGULARITY_DOCKER_USERNAME=vanessasaur
export SINGULARITY_DOCKER_PASSWORD=rawwwwwr
If you are having trouble, you can test your token by obtaining it on the command line and putting it into an environmental variable, :
CREDENTIAL=$(echo -n vanessa:[password] | base64)
TOKEN=$(http 'https://auth.docker.io/token?service=registry.docker.io&scope=repository:vanessa/code-samples:pull' Authorization:"Basic $CREDENTIAL" | jq -r '.token')
This should place the token in the environmental variable . To test that your token is valid, you can do the following
http https://index.docker.io/v2/vanessa/code-samples/tags/list Authorization:"Bearer $TOKEN"
The above call should return the tags list as expected. And of course you should change the repo name to be one that actually exists that you have credentials for.
Best Practices
While most docker images can import and run without a hitch, there are some special cases for which things can go wrong. Here is a general list of suggested practices, and if you discover a new one in your building ventures please let us know.
Don’t install anything to root’s home, .
Update the library cache at the end of your Dockerfile with a call to ldconfig.
Don’t put container valuables in or
Have any more best practices? Please let us know!
Troubleshooting
Why won’t my image build work? If you can’t find an answer on this site, please ping us an issue. If you’ve found an answer and you’d like to see it on the site for others to benefit from, then post to us here.
Troubleshooting
A little bit of help.
No space left on device
sudo singularity build fatty.simg Singularity
IOError: [Errno 28] No space left on device
ABORT: Aborting with RETVAL=255
The issue here is that during build of a squashfs image, Singularity is using the . If your is overflowing (or the mount is very small!) then you would see this error. As a test, you can try building a sandbox. If this is the issue, then the sandbox should work.
sudo singularity build --sandbox [fatty] Singularity
Segfault on Bootstrap of Centos Image
$ singularity shell docker://centos:6
Docker image path: index.docker.io/library/centos:6
Cache folder set to /home/jbdenis/.singularity/docker
Creating container runtime...
Singularity: Invoking an interactive shell within container...

Segmentation fault
The fix is on your host, you need to pass the variable to the kernel, meaning in the file (note, this file is debian specific), add the following:
GRUB_CMDLINE_LINUX_DEFAULT="vsyscall=emulate"
and then update grub and reboot:
update-grub && reboot
Please note that this change might have security implications that you should be aware of. For more information, see the original issue.
How to use Singularity with GRSecurity enabled kernerls
$ sudo sysctl -w kernel.grsecurity.chroot_caps=0
$ sudo sysctl -w kernel.grsecurity.chroot_deny_mount=0
$ sudo sysctl -w kernel.grsecurity.chroot_deny_chmod=0
$ sudo sysctl -w kernel.grsecurity.chroot_deny_fchdir=0
The container isn’t working on a different host!
rm -rf /tmp/homie && mkdir -p /tmp/homie && \
singularity exec -H /tmp/homie analysis.img /bin/bash
%runscript

# This specifies the python in the container
exec /usr/bin/python "$@"

# This may pick up a different one
exec python "$@"
This same idea would be useful if you are issuing the command to the container using . Thanks to yarikoptic for the suggestions on this issue.
Invalid Argument or Unknown Option
$ singularity run -B $PWD:/data my_container.img
Also, make sure you are using an up-to-date Singularity to bootstrap your container. Some features (such as ) will not work in earlier versions.
Error running Singularity with sudo
This fix solves the following error when Singularity is installed into the default compiled prefix of /usr/local:
$ sudo singularity instance.start container.img daemon1
sudo: singularity: command not found
Defaults secure_path = /sbin:/bin:/usr/sbin:/usr/bin:/usr/local/bin
How to resolve “Too many levels of symbolic links” error
$ singularity run -B /apps container.img
ERROR : There was an error binding the path /apps: Too many levels of symbolic links
ABORT : Retval = 255
You got this error because /apps directory is an autofs mount point. You can fix it by editing singularity.conf and adding the following directive with corresponding path:
autofs bug path = /apps
Commands
Command Usage
The Singularity command
$ singularity (opts1) [subcommand] (opts2) ...
- <a href=”#sec:build”>build</a>: Build a container on your user endpoint or build environment
- <a href=”#sec:exec”>exec</a>: Execute a command to your container
- <a href=”#sec:inspect”>inspect</a>: See labels, run and test scripts, and environment variables
- <a href=”#sec:pull”>pull</a>: pull an image from Docker or Singularity Hub
- <a href=”#sec:run”>run</a>: Run your image as an executable
- <a href=”#sec:shell”>shell</a>: Shell into your image
- <a href=”#sec:imageimport”>image.import</a>: import layers or other file content to your image
- <a href=”#sec:imageexport”>image.export</a>: export the contents of the image to tar or stream
- <a href=”#sec:imagecreate”>image.create</a>: create a new image, using the old ext3 filesystem
- <a href=”#sec:imageexpand”>image.expand</a>: increase the size of your image (old ext3)
- <a href=”#sec:instances”>instances</a>: Start, stop, and list container instances
- <a href=”#sec:bootstrap”>bootstrap</a>: Bootstrap a container recipe
For the full usage, <a href=”#sec:commandsusage”>see the bottom of this page</a>
Singularity comes with some internal documentation by using the subcommand followed by the subcommand you want more information about. For example:
$ singularity help create
CREATE OPTIONS:
    -s/--size   Specify a size for an operation in MiB, i.e. 1024*1024B
                (default 768MiB)
    -F/--force  Overwrite an image file if it exists

EXAMPLES:

    $ singularity create /tmp/Debian.img
    $ singularity create -s 4096 /tmp/Debian.img

For additional help, please visit our public documentation pages which are
found at:

    http://singularity.lbl.gov/
Commands Usage
USAGE: singularity [global options...] <command> [command options...] ...

GLOBAL OPTIONS:
    -d|--debug    Print debugging information
    -h|--help     Display usage summary
    -s|--silent   Only print errors
    -q|--quiet    Suppress all normal output
       --version  Show application version
    -v|--verbose  Increase verbosity +1
    -x|--sh-debug Print shell wrapper debugging information

GENERAL COMMANDS:
    help       Show additional help for a command or container
    selftest   Run some self tests for singularity install

CONTAINER USAGE COMMANDS:
    exec       Execute a command within container
    run        Launch a runscript within container
    shell      Run a Bourne shell within container
    test       Launch a testscript within container

CONTAINER MANAGEMENT COMMANDS:
    apps       List available apps within a container
    bootstrap  *Deprecated* use build instead
    build      Build a new Singularity container
    check      Perform container lint checks
    inspect    Display a container's metadata
    mount      Mount a Singularity container image
    pull       Pull a Singularity/Docker container to $PWD

COMMAND GROUPS:
    image      Container image command group
    instance   Persistent instance command group


CONTAINER USAGE OPTIONS:
    see singularity help <command>

For any additional help or support visit the Singularity
website: http://singularity.lbl.gov/
Support
Have a question, or need further information? Reach out to us.
build
Use to download and assemble existing containers, convert containers from one format to another, or build a container from a a href=”#sec:recipefile”>Singularity recipe</a>.
Overview
Examples
$ singularity build lolcow.simg shub://GodloveD/lolcow
$ singularity build lolcow.simg docker://godlovedc/lolcow
$ sudo singularity build --writable lolcow.img shub://GodloveD/lolcow
$ sudo singularity build --sandbox lolcow/ shub://GodloveD/lolcow
You can convert the three supported container formats using any combination.
$ sudo singularity build --writable development.img production.simg
$ singularity build --sandbox development/ production.simg
$ singularity build production2 development/
Given a Singularity Recipe called :
$ sudo singularity build lolcow.simg Singularity
exec
The Singularity sub-command allows you to spawn an arbitrary command within your container image as if it were running directly on the host system. All standard IO, pipes, and file systems are accessible via the command being exec’ed within the container. Note that this exec is different from the Docker exec, as it does not require a container to be “running” before using it.
Examples
$ singularity exec container.img cat /etc/os-release
PRETTY_NAME="Debian GNU/Linux 8 (jessie)"
NAME="Debian GNU/Linux"
VERSION_ID="8"
VERSION="8 (jessie)"
ID=debian
HOME_URL="http://www.debian.org/"
SUPPORT_URL="http://www.debian.org/support"
BUG_REPORT_URL="https://bugs.debian.org/"
$
Use the syntax like so:
$ singularity exec instance://my-instance cat /etc/os-release
If you are interested in containing an environment or filesystem locations, we highly recommend that you look at the and our documentation on flags to better customize this command.
And properly passing along special characters to the program within the container.
$ singularity exec container.img echo -ne "hello\nworld\n\n"
hello
world
$
$ cat debian.def | singularity exec container.img grep 'MirrorURL'
MirrorURL "http://ftp.us.debian.org/debian/"
$
Starting with the file in the current directory with the contents of:
#!/usr/bin/python

import sys
print("Hello World: The Python version is %s.%s.%s" % sys.version_info[:3])
Because our home directory is automatically bound into the container, and we are running this from our home directory, we can easily execute that script using the Python within the container:
$ singularity exec /tmp/Centos7-ompi.img /usr/bin/python hello.py
Hello World: The Python version is 2.7.5
We can also pipe that script through the container and into the Python binary which exists inside the container using the following command:
$ cat hello.py | singularity exec /tmp/Centos7-ompi.img /usr/bin/python
Hello World: The Python version is 2.7.5
For demonstration purposes, let’s also try to use the latest Python container which exists in DockerHub to run this script:
$ singularity exec docker://python:latest /usr/local/bin/python hello.py
library/python:latest
Downloading layer: sha256:a3ed95caeb02ffe68cdd9fd84406680ae93d633cb16422d00e8a7c22955b46d4
Downloading layer: sha256:fbd06356349dd9fb6af91f98c398c0c5d05730a9996bbf88ff2f2067d59c70c4
Downloading layer: sha256:644eaeceac9ff6195008c1e20dd693346c35b0b65b9a90b3bcba18ea4bcef071
Downloading layer: sha256:a3ed95caeb02ffe68cdd9fd84406680ae93d633cb16422d00e8a7c22955b46d4
Downloading layer: sha256:a3ed95caeb02ffe68cdd9fd84406680ae93d633cb16422d00e8a7c22955b46d4
Downloading layer: sha256:a3ed95caeb02ffe68cdd9fd84406680ae93d633cb16422d00e8a7c22955b46d4
Downloading layer: sha256:766692404ca72f4e31e248eb82f8eca6b2fcc15b22930ec50e3804cc3efe0aba
Downloading layer: sha256:a3ed95caeb02ffe68cdd9fd84406680ae93d633cb16422d00e8a7c22955b46d4
Downloading layer: sha256:a3ed95caeb02ffe68cdd9fd84406680ae93d633cb16422d00e8a7c22955b46d4
Downloading layer: sha256:6a3d69edbe90ef916e1ecd8d197f056de873ed08bcfd55a1cd0b43588f3dbb9a
Downloading layer: sha256:ff18e19c2db42055e6f34323700737bde3c819b413997cddace2c1b7180d7efd
Downloading layer: sha256:7b9457ec39de00bc70af1c9631b9ae6ede5a3ab715e6492c0a2641868ec1deda
Downloading layer: sha256:a3ed95caeb02ffe68cdd9fd84406680ae93d633cb16422d00e8a7c22955b46d4
Downloading layer: sha256:6a5a5368e0c2d3e5909184fa28ddfd56072e7ff3ee9a945876f7eee5896ef5bb
Hello World: The Python version is 3.5.2
If your host system has an NVIDIA GPU card and a driver installed you can leverage the card with the option. (This example requires a fairly recent version of the NVIDIA driver on the host system to run the latest version of TensorFlow.
$ git clone https://github.com/tensorflow/models.git
$ singularity exec --nv docker://tensorflow/tensorflow:latest-gpu \
    python ./models/tutorials/image/mnist/convolutional.py
Docker image path: index.docker.io/tensorflow/tensorflow:latest-gpu
Cache folder set to /home/david/.singularity/docker
[19/19] |===================================| 100.0%
Creating container runtime...
Extracting data/train-images-idx3-ubyte.gz
Extracting data/train-labels-idx1-ubyte.gz
Extracting data/t10k-images-idx3-ubyte.gz
Extracting data/t10k-labels-idx1-ubyte.gz
2017-08-18 20:33:59.677580: W tensorflow/core/platform/cpu_feature_guard.cc:45] The TensorFlow library wasn't compiled to use SSE4.1 instructions, but these are available on your machine and could speed up CPU computations.
2017-08-18 20:33:59.677620: W tensorflow/core/platform/cpu_feature_guard.cc:45] The TensorFlow library wasn't compiled to use SSE4.2 instructions, but these are available on your machine and could speed up CPU computations.
2017-08-18 20:34:00.148531: I tensorflow/stream_executor/cuda/cuda_gpu_executor.cc:893] successful NUMA node read from SysFS had negative value (-1), but there must be at least one NUMA node, so returning NUMA node zero
2017-08-18 20:34:00.148926: I tensorflow/core/common_runtime/gpu/gpu_device.cc:955] Found device 0 with properties:
name: GeForce GTX 760 (192-bit)
major: 3 minor: 0 memoryClockRate (GHz) 0.8885
pciBusID 0000:03:00.0
Total memory: 2.95GiB
Free memory: 2.92GiB
2017-08-18 20:34:00.148954: I tensorflow/core/common_runtime/gpu/gpu_device.cc:976] DMA: 0
2017-08-18 20:34:00.148965: I tensorflow/core/common_runtime/gpu/gpu_device.cc:986] 0:   Y
2017-08-18 20:34:00.148979: I tensorflow/core/common_runtime/gpu/gpu_device.cc:1045] Creating TensorFlow device (/gpu:0) -> (device: 0, name: GeForce GTX 760 (192-bit), pci bus id: 0000:03:00.0)
Initialized!
Step 0 (epoch 0.00), 21.7 ms
Minibatch loss: 8.334, learning rate: 0.010000
Minibatch error: 85.9%
Validation error: 84.6%
Step 100 (epoch 0.12), 20.9 ms
Minibatch loss: 3.235, learning rate: 0.010000
Minibatch error: 4.7%
Validation error: 7.8%
Step 200 (epoch 0.23), 20.5 ms
Minibatch loss: 3.363, learning rate: 0.010000
Minibatch error: 9.4%
Validation error: 4.2%
[...snip...]
Step 8500 (epoch 9.89), 20.5 ms
Minibatch loss: 1.602, learning rate: 0.006302
Minibatch error: 0.0%
Validation error: 0.9%
Test error: 0.8%
inspect
JSON Api Standard
For any inspect command, by adding –json you can be assured to get a JSON API standardized response, for example:
singularity inspect -l --json ubuntu.img
{
    "data": {
        "attributes": {
            "labels": {
                "SINGULARITY_DEFFILE_BOOTSTRAP": "docker",
                "SINGULARITY_DEFFILE": "Singularity",
                "SINGULARITY_BOOTSTRAP_VERSION": "2.2.99",
                "SINGULARITY_DEFFILE_FROM": "ubuntu:latest"
            }
        },
        "type": "container"
    }
}
Inspect Flags
The default, if run without any arguments, will show you the container labels file
$ singularity inspect ubuntu.img
{
    "SINGULARITY_DEFFILE_BOOTSTRAP": "docker",
    "SINGULARITY_DEFFILE": "Singularity",
    "SINGULARITY_BOOTSTRAP_VERSION": "2.2.99",
    "SINGULARITY_DEFFILE_FROM": "ubuntu:latest"
}
and as outlined in the usage, you can specify to see any combination of , , , , and . The quick command to see everything, in json format, would be:
$ singularity inspect -l -r -d -t -e -j -hf ubuntu.img
{
    "data": {
        "attributes": {
            "test": null,
            "help": "This is how you run the image!\n",
            "environment": "# Custom environment shell code should follow\n\n",
            "labels": {
                "SINGULARITY_DEFFILE_BOOTSTRAP": "docker",
                "SINGULARITY_DEFFILE": "Singularity",
                "SINGULARITY_BOOTSTRAP_VERSION": "2.2.99",
                "SINGULARITY_DEFFILE_FROM": "ubuntu:latest"
            },
            "deffile": "Bootstrap:docker\nFrom:ubuntu:latest\n",
            "runscript": "#!/bin/sh\n\nexec /bin/bash \"$@\""
        },
        "type": "container"
    }
}
The default, if run without any arguments, will show you the container labels file (located at in the container. These labels are the ones that you define in the section of your bootstrap file, along with any Docker that came with an image that you imported, and other metadata about the bootstrap. For example, here we are inspecting labels for
$ singularity inspect ubuntu.img
{
    "SINGULARITY_DEFFILE_BOOTSTRAP": "docker",
    "SINGULARITY_DEFFILE": "Singularity",
    "SINGULARITY_BOOTSTRAP_VERSION": "2.2.99",
    "SINGULARITY_DEFFILE_FROM": "ubuntu:latest"
}
$ singularity inspect -l ubuntu.img
$ singularity inspect --labels ubuntu.img
The commands or will show you the runscript, which also can be shown in :
$ singularity inspect -r -j ubuntu.img{
    "data": {
        "attributes": {
            "runscript": "#!/bin/sh\n\nexec /bin/bash \"$@\""
        },
        "type": "container"
    }
}
or in a human friendly, readable print to the screen:
$ singularity inspect -r ubuntu.img

##runscript
#!/bin/sh

exec /bin/bash "$@"
singularity inspect -hf -j dino.img
{
    "data": {
        "attributes": {
            "help": "\n\n\nHi there! This is my image help section.\n\nUsage:\n\nboobeep doo doo\n\n --arg/a arrrrg I'm a pirate!\n --boo/b eeeeeuzzz where is the honey?\n\n\n"
        },
        "type": "container"
    }
}
or in a human friendly, readable print to the screen, don’t use or :
$ singularity inspect -hf dino.img


Hi there! This is my image help section.

Usage:

boobeep doo doo

 --arg/a arrrrg I'm a pirate!
 --boo/b eeeeeuzzz where is the honey?
The commands and will show you the container’s environment, again specified by the section of a bootstrap file, and other ENV labels that might have come from a Docker import. You can again choose to see :
$ singularity inspect -e --json ubuntu.img
{
    "data": {
        "attributes": {
            "environment": "# Custom environment shell code should follow\n\n"
        },
        "type": "container"
    }
}
or human friendly:
$ singularity inspect -e ubuntu.img

##environment
# Custom environment shell code should follow
The container in the example above did not have any custom environment variables set.
$ singularity --inspect -t --json ubuntu.img
{
    "data": {
        "attributes": {
            "test": null
        },
        "type": "container"
    }
}

$ singularity inspect -t  ubuntu.img
{
    "status": 404,
    "detail": "This container does not have any tests defined",
    "title": "Tests Undefined"
}
Want to know where your container came from? You can see the entire Singularity definition file, if the container was created with a bootstrap, by using or :
$ singularity inspect -d  ubuntu.img

##deffile
Bootstrap:docker
From:ubuntu:latest
or with output.
$ singularity inspect -d --json ubuntu.img
{
    "data": {
        "attributes": {
            "deffile": "Bootstrap:docker\nFrom:ubuntu:latest\n"
        },
        "type": "container"
    }
}
The goal of these commands is to bring more transparency to containers, and to help better integrate them into common workflows by having them expose their guts to the world! If you have feedback for how we can improve or amend this, please let us know!
pull
Singularity Hub
Singularity differs from Docker in that we serve entire images, as opposed to layers. This means that pulling a Singularity Hub means downloading the entire (compressed) container file, and then having it extract on your local machine. The basic command is the following:
singularity pull shub://vsoch/hello-world
Progress |===================================| 100.0%
Done. Container is at: ./vsoch-hello-world-master.img
On Singularity Hub, a coincide with a branch. So if you have a repo called , by default the file called (your build recipe file) will be looked for in the base of the master branch. The command that we issued above would be equivalent to doing:
singularity pull shub://vsoch/hello-world:master
To enable other branches to build, they must be turned on in your collection (more details are available in the Singularity Hub docs). If you then put another Singularity file in a branch called development, you would pull it as follows:
singularity pull shub://vsoch/hello-world:development
The term latest in Singularity Hub will pull, across all of your branches, the most recent image. If development is more recent than master, it would be pulled, for example.
As you can see, since we didn’t specify anything special, the default naming convention is to use the username, reponame, and the branch (tag). You have three options for changing this:
PULL OPTIONS:
    -n/--name   Specify a custom container name (first priority)
    -C/--commit Name container based on GitHub commit (second priority)
    -H/--hash   Name container based on file hash (second priority)
singularity pull --name meatballs.img shub://vsoch/hello-world
Progress |===================================| 100.0%
Done. Container is at: ./meatballs.img
Each container build on Singularity Hub is associated with the GitHub commit of the repo that was used to build it. You can specify to name your container based on the commit with the flag, if, for example, you want to match containers to their build files:
singularity pull --commit shub://vsoch/hello-world
Progress |===================================| 100.0%
Done. Container is at: ./4187993b8b44cbfa51c7e38e6b527918fcdf0470.img
If you prefer the hash of the file itself, you can do that too.
singularity pull --hash shub://vsoch/hello-world
Progress |===================================| 100.0%
Done. Container is at: ./4db5b0723cfd378e332fa4806dd79e31.img
SINGULARITY_PULLFOLDER=/tmp
singularity pull shub://vsoch/hello-world
Progress |===================================| 100.0%
Done. Container is at: /tmp/vsoch-hello-world-master.img
singularity pull shub://vsoch/hello-world@42e1f04ed80217895f8c960bdde6bef4d34fab59
Progress |===================================| 100.0%
Done. Container is at: ./vsoch-hello-world-master.img
In this example, the first build of this container will be pulled.
Docker
Docker pull is similar (on the surface) to a Singularity Hub pull, and we would do the following:
singularity pull docker://ubuntu
Initializing Singularity image subsystem
Opening image file: ubuntu.img
Creating 223MiB image
Binding image to loop
Creating file system within image
Image is done: ubuntu.img
Docker image path: index.docker.io/library/ubuntu:latest
Cache folder set to /home/vanessa/.singularity/docker
Importing: base Singularity environment
Importing: /home/vanessa/.singularity/docker/sha256:b6f892c0043b37bd1834a4a1b7d68fe6421c6acbc7e7e63a4527e1d379f92c1b.tar.gz
Importing: /home/vanessa/.singularity/docker/sha256:55010f332b047687e081a9639fac04918552c144bc2da4edb3422ce8efcc1fb1.tar.gz
Importing: /home/vanessa/.singularity/docker/sha256:2955fb827c947b782af190a759805d229cfebc75978dba2d01b4a59e6a333845.tar.gz
Importing: /home/vanessa/.singularity/docker/sha256:3deef3fcbd3072b45771bd0d192d4e5ff2b7310b99ea92bce062e01097953505.tar.gz
Importing: /home/vanessa/.singularity/docker/sha256:cf9722e506aada1109f5c00a9ba542a81c9e109606c01c81f5991b1f93de7b66.tar.gz
Importing: /home/vanessa/.singularity/metadata/sha256:fe44851d529f465f9aa107b32351c8a0a722fc0619a2a7c22b058084fac068a4.tar.gz
Done. Container is at: ubuntu.img
If you specify the tag, the image would be named accordingly (eg, ). Did you notice that the output looks similar to if we did the following?
singularity create ubuntu.img
singularity import ubuntu.img docker://ubuntu
this is because the same logic is happening on the back end. Thus, the pull command with a docker uri also supports arguments and Here is how I would pull an ubuntu image, but make it bigger, and name it something else.
singularity pull --size 2000 --name jellybelly.img docker://ubuntu
Initializing Singularity image subsystem
Opening image file: jellybelly.img
Creating 2000MiB image
Binding image to loop
Creating file system within image
Image is done: jellybelly.img
Docker image path: index.docker.io/library/ubuntu:latest
Cache folder set to /home/vanessa/.singularity/docker
Importing: base Singularity environment
Importing: /home/vanessa/.singularity/docker/sha256:b6f892c0043b37bd1834a4a1b7d68fe6421c6acbc7e7e63a4527e1d379f92c1b.tar.gz
Importing: /home/vanessa/.singularity/docker/sha256:55010f332b047687e081a9639fac04918552c144bc2da4edb3422ce8efcc1fb1.tar.gz
Importing: /home/vanessa/.singularity/docker/sha256:2955fb827c947b782af190a759805d229cfebc75978dba2d01b4a59e6a333845.tar.gz
Importing: /home/vanessa/.singularity/docker/sha256:3deef3fcbd3072b45771bd0d192d4e5ff2b7310b99ea92bce062e01097953505.tar.gz
Importing: /home/vanessa/.singularity/docker/sha256:cf9722e506aada1109f5c00a9ba542a81c9e109606c01c81f5991b1f93de7b66.tar.gz
Importing: /home/vanessa/.singularity/metadata/sha256:fe44851d529f465f9aa107b32351c8a0a722fc0619a2a7c22b058084fac068a4.tar.gz
Done. Container is at: jellybelly.img
run
It’s common to want your container to “do a thing.” Singularity allows you to define a custom action to be taken when a container is either or executed directly by file name. Specifically, you might want it to execute a command, or run an executable that gives access to many different functions for the user.
Overview
First, how do we run a container? We can do that in one of two ways - the commands below are identical:
$ singularity run centos7.img
$ ./centos7.img
In both cases, we are executing the container’s “runscript” (the executable at the root of the image) that is either an actual file (version 2.2 and earlier) or a link to one (2.3 and later). For example, looking at a 2.3 image, I can see the runscript via the path to the link:
$ singularity exec centos7.img cat /singularity
#!/bin/sh

exec /bin/bash "$@"
or to the actual file in the container’s metadata folder,
$ singularity exec centos7.img cat /.singularity.d/runscript
#!/bin/sh

exec /bin/bash "$@"
Runtime Flags
If you are interested in containing an environment or filesystem locations, we highly recommend that you look at the and our documentation on flags to better customize this command.
Examples
$ singularity exec centos7.img cat /singularity
#!/bin/sh

echo motorbot

$ singularity run centos7.img
motorbot
When you first create a container, the runscript is defined using the following order of operations:
- A user defined runscript in the section of a bootstrap takes preference over all
- If the user has not defined a runscript and is importing a Docker container, the Docker is used.
- If a user has not defined a runscript and adds to the bootstrap file, the is used over the
- If the user has not defined a runscript and the Docker container doesn’t have an , we look for , even if the user hasn’t asked for it.
- If the user has not defined a runscript, and there is no or (or we aren’t importing Docker at all) then we default to
Here is how you would define the runscript section when you a href=”#sec:buildcontainer”>build</a> an image:
Bootstrap: docker
From: ubuntu:latest

%runscript
exec /usr/bin/python "$@"
and of course python should be installed as /usr/bin/python. The addition of ensures that arguments are passed along from the user. If you want your container to run absolutely any command given to it, and you want to use run instead of exec, you could also just do:
Bootstrap: docker
From: ubuntu:latest

%runscript
exec "$@"`
If you want different entrypoints for your image, we recommend using the %apprun syntax (see <a href=”#sec:scifapps”>apps</a> ). Here we have two entrypoints for foo and bar:
%runscript
exec echo "Try running with --app dog/cat"

%apprun dog
exec echo Hello "$@", this is Dog

%apprun cat
exec echo Meow "$@", this is Cat
and then running (after build of a complete recipe) would look like:
sudo singularity build catdog.simg Singularity

$ singularity run catdog.simg
Try running with --app dog/cat

$ singularity run --app cat catdog.simg
 Meow , this is Cat
$ singularity run --app dog catdog.simg
Hello , this is Dog
Generally, it is advised to provide help for your container with or . If you find it easier, you can also provide help by way of a runscript that tells your user how to use the container, and gives access to the important executables. Regardless of your strategy. a reproducible container is one that tells the user how to interact with it.
shell
The Singularity sub-command will automatically spawn an interactive shell within a container. As of v2.3 the default that is spawned via the shell command is if it exists otherwise is called.
$ singularity shell
USAGE: singularity (options) shell [container image] (options)
Here we can see the default shell in action:
$ singularity shell centos7.img
Singularity: Invoking an interactive shell within container...

Singularity centos7.img:~> echo $SHELL
/bin/bash
Additionally any arguments passed to the Singularity command (after the container name) will be passed to the called shell within the container, and shell can be used across image types. Here is a quick example of shelling into a container assembled from Docker layers. We highly recommend that you look at the and our documentation on flags to better customize this command.
Change your shell
The sub-command allows you to set or change the default shell using the argument. As of Singularity version 2.2, you can also use the environment variable which will use that as your shell entry point into the container.
export SINGULARITY_SHELL="/bin/bash --norc"
singularity shell centos7.img Singularity: Invoking an interactive shell within container...
Singularity centos7.img:~/Desktop> echo $SHELL
/bin/bash --norc
Don’t do this, it can be confusing:
$ export SINGULARITY_SHELL=/bin/bash
$ singularity shell centos7.img
Singularity: Invoking an interactive shell within container...

# What? We are still on my Desktop? Actually no, but the uri says we are!
vanessa@vanessa-ThinkPad-T460s:~/Desktop$ echo $SHELL
/bin/bash
Depending on your shell, you might also want the flag. How can you learn more about a shell? Ask it for help, of course!
Shell Help
$ singularity shell centos7.img --help
Singularity: Invoking an interactive shell within container...

GNU bash, version 4.2.46(1)-release-(x86_64-redhat-linux-gnu)
Usage:  /bin/bash [GNU long option] [option] ...
    /bin/bash [GNU long option] [option] script-file ...
GNU long options:
    --debug
    --debugger
    --dump-po-strings
    --dump-strings
    --help
    --init-file
    --login
    --noediting
    --noprofile
    --norc
    --posix
    --protected
    --rcfile
    --rpm-requires
    --restricted
    --verbose
    --version
Shell options:
    -irsD or -c command or -O shopt_option      (invocation only)
    -abefhkmnptuvxBCHP or -o option
Type `/bin/bash -c "help set"' for more information about shell options.
Type `/bin/bash -c help' for more information about shell builtin commands.
$ singularity shell centos7.img -c "echo hello world"
Singularity: Invoking an interactive shell within container...

hello world
Image Command Group
image.export
singularity image.export container.img > container.tar
We can also specify the file with
singularity image.export --file container.tar container.img
And here is the recommended way to compress your image:
singularity image.export container.img | gzip -9 > container.img.tar.gz
image.expand
While the squashfs filesystem means that you typically don’t need to worry about the size of your container being built, you might find that if you are building an ext3 image (pre Singularity 2.4) you want to expand it.
Increasing the size of an existing image
- create an empty image
- inspect it’s size
- expand it
- confirm it’s larger
$ singularity image.create container.img
Creating empty 768MiB image file: container.imglarity image.create container.im
Formatting image with ext3 file system
Image is done: container.img

$ ls -lh container.img
-rw-rw-r-- 1 vanessa vanessa 768M Oct  2 18:48 container.img

$ singularity image.expand container.img
Expanding image by 768MB
Checking image's file system
e2fsck 1.42.13 (17-May-2015)
Pass 1: Checking inodes, blocks, and sizes
Pass 2: Checking directory structure
Pass 3: Checking directory connectivity
Pass 4: Checking reference counts
Pass 5: Checking group summary information
container.img: 11/49152 files (0.0% non-contiguous), 7387/196608 blocks
Resizing image's file system
resize2fs 1.42.13 (17-May-2015)
Resizing the filesystem on container.img to 393216 (4k) blocks.
The filesystem on container.img is now 393216 (4k) blocks long.
Image is done: container.img

$ ls -lh container.img
-rw-rw-r-- 1 vanessa vanessa 1.5G Oct  2 18:48 container.img
Similar to the create sub-command, you can override the default size increase (which is 768MiB) by using the option.
image.import
singularity image.import container.img docker://ubuntu:latest
image.create
Creating a new blank Singularity container image
Singularity will create a default container image of 768MiB using the following command:
singularity image.create container.img
Creating empty 768MiB image file: container.img
Formatting image with ext3 file system
Image is done: container.img
$ du -sh container.img
29M     container.img
Create will make an filesystem. Let’s create and import a docker base (the pre-2.4 way with two commands), and then compare to just building (one command) from the same base.
singularity create container.img
sudo singularity bootstrap container.img docker://ubuntu

...

$ du -sh container.img
769M
Prior to 2.4, you would need to provide a to change from the default:
$ singularity create --size 2048 container2.img
Initializing Singularity image subsystem
Opening image file: container2.img
Creating 2048MiB image
Binding image to loop
Creating file system within image
Image is done: container2.img

$ ls -lh container*.img
-rwxr-xr-x 1 user group 2.1G Apr 15 11:34 container2.img
-rwxr-xr-x 1 user group 769M Apr 15 11:11 container.img
Now let’s compare to if we just built, without needing to specify a size.
sudo singularity build container.simg docker://ubuntu

...

du -sh container.simg
45M container.simg
Quite a difference! And one command instead of one.
For any commands that If you have already created an image and wish to overwrite it, you can do so with the option.
$ singularity image.create container.img
ERROR: Image file exists, not overwriting.


$ singularity image.create --force container.img
Creating empty 768MiB image file: container.img
Formatting image with ext3 file system
Image is done: container.img
has provided a nice interactive demonstration of creating an image (pre 2.4).
Instance Command Group
instance.start
New in Singularity version 2.4 you can use the command group to run instances of containers in the background. This is useful for running services like databases and web servers. The command lets you initiate a named instance in the background.
Overview
To initiate a named instance of a container, you must call the command with 2 arguments: the name of the container that you want to start and a unique name for an instance of that container. Once the new instance is running, you can join the container’s namespace using a URI style syntax like so:
$ singularity shell instance://<instance_name>
singularity help instance.start
Examples
These examples use a container from Singularity Hub, but you can use local containers or containers from Docker Hub as well. For a more detailed look at usage see <a href=”#sec:instances”>Running Instances</a>.
$ singularity instance.start shub://GodloveD/lolcow cow1
$ singularity shell instance://cow1
Singularity GodloveD-lolcow-master.img:~> ps -ef
UID        PID  PPID  C STIME TTY          TIME CMD
ubuntu       1     0  0 20:03 ?        00:00:00 singularity-instance: ubuntu [cow1]
ubuntu       3     0  0 20:04 pts/0    00:00:00 /bin/bash --norc
ubuntu       4     3  0 20:04 pts/0    00:00:00 ps -ef
Singularity GodloveD-lolcow-master.img:~> exit
$ singularity run instance://cow1
 _________________________________________
/ Clothes make the man. Naked people have \
| little or no influence on society.      |
|                                         |
\ -- Mark Twain                           /
 -----------------------------------------
        \   ^__^
         \  (oo)\_______
            (__)\       )\/\
                ||----w |
                ||     ||
$ singularity exec instance://cow1 cowsay "I like blending into the background"
_____________________________________
< I like blending into the background >
-------------------------------------
\ ^__^
\ (oo)\_______
(__)\ )\/\
||----w |
|| ||
instance.list
New in Singularity version 2.4 you can use the command group to run instances of containers in the background. This is useful for running services like databases and web servers. The command lets you keep track of the named instances running in the background.
Overview
After initiating one or more named instances to run in the background with the command you can list them with the command.
Examples
These examples use a container from Singularity Hub, but you can use local containers or containers from Docker Hub as well. For a more detailed look at usage see <a href=”#sec:instances”>Running Instances</a>.
$ singularity instance.start shub://GodloveD/lolcow cow1
$ singularity instance.start shub://GodloveD/lolcow cow2
$ singularity instance.start shub://vsoch/hello-world hiya
$ singularity instance.list
DAEMON NAME PID CONTAINER IMAGE
cow1 20522 /home/ubuntu/GodloveD-lolcow-master.img
cow2 20558 /home/ubuntu/GodloveD-lolcow-master.img
hiya 20595 /home/ubuntu/vsoch-hello-world-master.img
instance.stop
New in Singularity version 2.4 you can use the command group to run instances of containers in the background. This is useful for running services like databases and web servers. The command lets you stop instances once you are finished using them
Overview
After initiating one or more named instances to run in the background with the command you can stop them with the command.
Examples
These examples use a container from Singularity Hub, but you can use local containers or containers from Docker Hub as well. For a more detailed look at usage see <a href=”#sec:instances”>Running Instances</a>.
$ singularity instance.start shub://GodloveD/lolcow cow1
$ singularity instance.start shub://GodloveD/lolcow cow2
$ singularity instance.start shub://vsoch/hello-world hiya
$ singularity instance.stop cow1
Stopping cow1 instance of /home/ubuntu/GodloveD-lolcow-master.img (PID=20522)
$ singularity instance.stop --all
Stopping cow2 instance of /home/ubuntu/GodloveD-lolcow-master.img (PID=20558)
Stopping hiya instance of /home/ubuntu/vsoch-hello-world-master.img (PID=20595)
Deprecated
Note: The bootstrap command is deprecated for Singularity Version 2.4. You should use <a href=”#sec:buildcontainer”>build</a> instead.
bootstrap
Bootstrapping was the original way (for Singularity versions prior to 2.4) to install an operating system and then configure it appropriately for a specified need. Bootstrap is very similar to build, except that it by default uses an ext3 filesystem and allows for writability. The images unfortunately are not immutable in this way, and can degrade over time. As of 2.4, bootstrap is still supported for Singularity, however we encourage you to use <a href=”#sec:buildcontainer”>build</a> instead.
Quick Start
$ singularity bootstrap
USAGE: singularity [...] bootstrap <container path> <definition file>
Bootstrap:docker
From:ubuntu:latest
$ singularity image.create ubuntu.img
Initializing Singularity image subsystem
Opening image file: ubuntu.img
Creating 768MiB image
Binding image to loop
Creating file system within image
Image is done: ubuntu.img
and finally run the bootstrap command, pointing to your image ( ) and the file Singularity ().
$ sudo singularity bootstrap ubuntu.img Singularity
Sanitizing environment
Building from bootstrap definition recipe
Adding base Singularity environment to container
Docker image path: index.docker.io/library/ubuntu:latest
Cache folder set to /root/.singularity/docker
[5/5] |===================================| 100.0%
Exploding layer: sha256:b6f892c0043b37bd1834a4a1b7d68fe6421c6acbc7e7e63a4527e1d379f92c1b.tar.gz
Exploding layer: sha256:55010f332b047687e081a9639fac04918552c144bc2da4edb3422ce8efcc1fb1.tar.gz
Exploding layer: sha256:2955fb827c947b782af190a759805d229cfebc75978dba2d01b4a59e6a333845.tar.gz
Exploding layer: sha256:3deef3fcbd3072b45771bd0d192d4e5ff2b7310b99ea92bce062e01097953505.tar.gz
Exploding layer: sha256:cf9722e506aada1109f5c00a9ba542a81c9e109606c01c81f5991b1f93de7b66.tar.gz
Exploding layer: sha256:fe44851d529f465f9aa107b32351c8a0a722fc0619a2a7c22b058084fac068a4.tar.gz
Finalizing Singularity container
Notice that bootstrap does require sudo. If you do an import, with a docker uri for example, you would see a similar flow, but the calling user would be you, and the cache your .
$ singularity image.create ubuntu.img
singularity import ubuntu.img docker://ubuntu:latest
Docker image path: index.docker.io/library/ubuntu:latest
Cache folder set to /home/vanessa/.singularity/docker
Importing: base Singularity environment
Importing: /home/vanessa/.singularity/docker/sha256:b6f892c0043b37bd1834a4a1b7d68fe6421c6acbc7e7e63a4527e1d379f92c1b.tar.gz
Importing: /home/vanessa/.singularity/docker/sha256:55010f332b047687e081a9639fac04918552c144bc2da4edb3422ce8efcc1fb1.tar.gz
Importing: /home/vanessa/.singularity/docker/sha256:2955fb827c947b782af190a759805d229cfebc75978dba2d01b4a59e6a333845.tar.gz
Importing: /home/vanessa/.singularity/docker/sha256:3deef3fcbd3072b45771bd0d192d4e5ff2b7310b99ea92bce062e01097953505.tar.gz
Importing: /home/vanessa/.singularity/docker/sha256:cf9722e506aada1109f5c00a9ba542a81c9e109606c01c81f5991b1f93de7b66.tar.gz
Importing: /home/vanessa/.singularity/metadata/sha256:fe44851d529f465f9aa107b32351c8a0a722fc0619a2a7c22b058084fac068a4.tar.gz
For details and best practices for creating your Singularity recipe, <a href=”#sec:recipefile”>read about them here</a>.